I'm all about Ember.js recently

Rock and Roll With Ember.js Updated to Ember 2.2.0

I have updated the app developed in the Rock and Roll with Ember.js book to Ember 2.2 and Ember CLI 1.13.12. I also replaced the now defunct Divshot deployment section with another great & simple deployment option, PageFront.

Above that, there is a great deal of “bug fixes and stability improvements” in this release, the list of which can be viewed on Github.

Thank you to everybody who reported issues and helped to improve the book.

The Tale of Two Bindings

Two weeks ago I had a presentation called “Complex component design” at the Global Ember Meetup.

When I had given the title and abstract of this presentation, I had wanted to speak about how to implement more involved, nested components in Ember 2 (but actually, more like 1.13+), which is a fascinating and complex (pun intended) topic. I had something like a highly reusable autocomplete input component in mind something that I had decided to explore further.

When I sat down to think about it, I had realized there is a related and equally fascinating topic, that of communication between components that live on the same page. As everything is soon becoming a component in Ember, the two are very similar. A difference is that communicating components in an app do not need such a high degree of flexibility as a reusable component (like an Ember addon). In any case, it does not hurt, since making them flexible facilitates their reuse.

In this post, I’ll show an example of simple component communication and focus on how moving from two-way bindings to one-way bindings changes that. Spending some time on playing around with this, I was very pleasantly surprised in what this shift enables.

The example

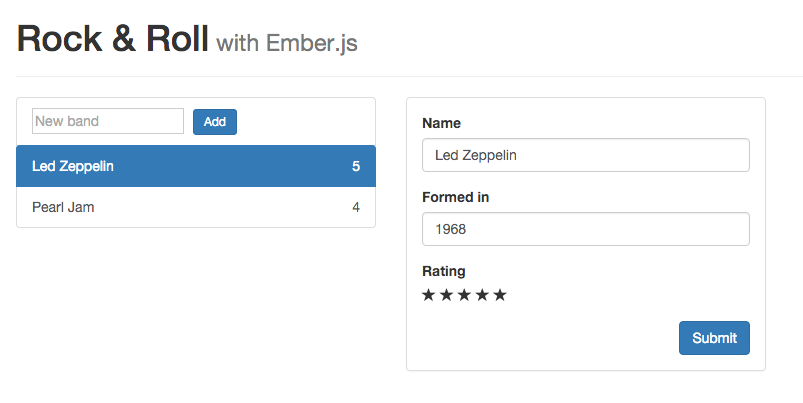
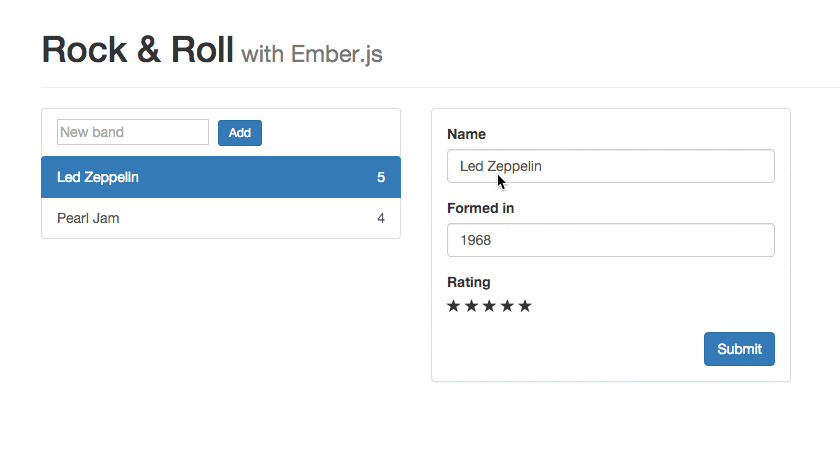
If you know me a bit, you’d expect the “app” to be Rock & Roll themed and you’d be right. I reduced the app in the book to a very simple interface where you can pick a band and then edit it on a form:

Edit band on a form

In the remainder of the post, we’ll see different implementations to achieve the validation and saving of the band. There will be 3 scenarios: the traditional one, using two-way bindings, the Glimmer version, using one-way bindings, DOM events and Data Down, Actions up (DDAU) and finally 1WAY Deluxe™: adding a few features on top of the second scenario that one-way bindings make easy (or possible at all).

Take 1: Traditional, two-way bound

Ignoring the list of bands on the left, the template belonging to the band route, where the band can be edited, contains the band-form (on the right of the screenshot), and some minimal markup. We pass in the band object, the on-save and the on-star-click closure actions to the band form:

<div class="panel panel-default band-panel">
  <div class="panel-body">
    {{band-form band=model
                errors=errors
                on-save=(action "saveBand")
                on-star-click=(action "updateRating")}}
  </div>
</div>

The controller has these actions, sets up the errors object and contains the validation logic. The hasErrors property will be true if the band’s name is empty:

import Ember from 'ember';

export default Ember.Controller.extend({
  hasValidName: Ember.computed.notEmpty('model.name'),
  hasErrors: Ember.computed.not('hasValidName'),

  setupErrors: Ember.on('init', function() {
    this.set('errors', Ember.Object.create());
  }),

  validate() {
    this.set('errors.name', this.get('hasValidName') ? null : "Name is required.");
  },

  actions: {
    updateRating(params) {
      const { item: band, rating } = params;
      band.set('rating', rating);
    },

    saveBand() {
      this.validate();
      if (this.get('hasErrors')) {
        return;
      }

      const band = this.get('model');
      return band.save().then(() => {
        console.log("Band is saved");
      });
    }
  }
});

Upon validation, the errors are set but this is only needed to be able to show the error in the template. this.get('hasErrors') is already true if the band’s name is an empty string.

The missing piece is the band-form template:

<div class={{if errors.name "form-group has-error" "form-group"}}>
  <label for="band-name">Name</label>
  {{input type="text" class="form-control" id="band-name" value=band.name}}
</div>
<div class="form-group">
  <label for="band-year">Formed in</label>
  {{input type="text" class="form-control" id="band-year" value=band.year}}
</div>
<div class="form-group">
  <label for="band-rating">Rating</label>
  {{star-rating id="band-rating" item=band rating=band.rating on-click=on-star-click}}
</div>
<button type="submit" class="btn btn-primary pull-right" {{action "saveBand"}}>Submit</button>

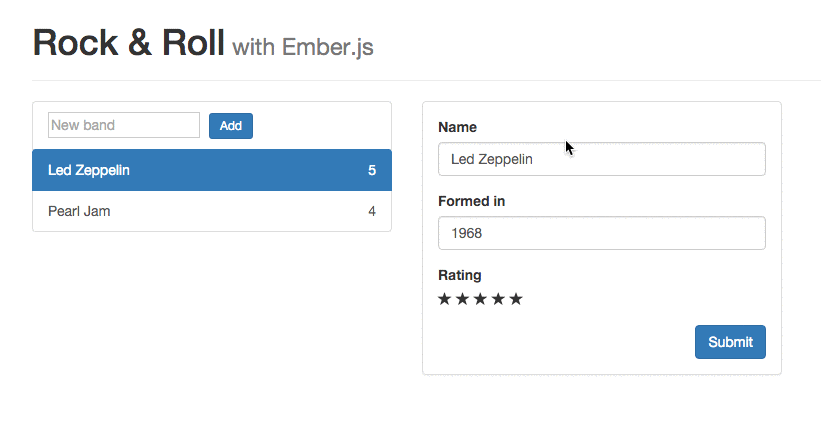
It uses the input helper which established two-way bindings between the value of the input and the property that was passed to it. When the user modifies the input, band.name changes in sync. Since band in the component is the model of the controller, the band name in the list changes as the name is edited:

Two-way bindings in action

In this scenario, communication between the top-level component (controller, if you will) and the band form is quite blunt. As data is two-way bound, there is no simple, “in-framework” way of not changing the name in the list when the name on the form is modified. There is shared state and the components do not act via messages: they pull two ends of the same string.

(In cases where you had to prevent that in the pre-Glimmer era, you had to resort to using a separate property, like band.newName, or using BufferedProxy.)

So let’s take a step forwards and see how this can be improved.

Take 2: One-way bound with DDAU

We’ll first replace the two-way binding with a one-way one and manually synchronize the upstream direction using DDAU. It will not seem like a big gain but it will enable us to go further and attain 1WAY Deluxe™.

The top-level template only needs a slight change. We no longer pass in an on-star-click action but instead an on-update one. This will serve for the upstream synchronization, setting what changed in the component on the band object (the model) of the controller.

<div class="panel panel-default band-panel">
  <div class="panel-body">
    {{band-form band=model
                errors=errors
                on-save=(action "saveBand")
                on-update=(action "updateBandProperty")}}
  </div>
</div>

In accordance, the only thing that has changed in the controller is that the updateStarRating action has been replaced by updateBandProperty. This is the manual syncing:

export default Ember.Controller.extend({
  (...)
  actions: {
    updateBandProperty(property, value) {
      this.get('model').set(property, value);
    },

    (...)
  }
});

In the template, the two-way bound input helpers are out, substituted by regular input tags. We attach event listeners to them which will trigger the synchronization proces (I wrote a post about how that works a few months ago):

<div class={{if errors.name "form-group has-error" "form-group"}}>
  <label for="band-name">Name</label>
  <input type="text" class="form-control" id="band-name" value={{band.name}}
    oninput={{action "nameDidChange" value="target.value"}} />
</div>
<div class="form-group">
  <label for="band-year">Formed in</label>
  <input type="text" class="form-control" id="band-year" value={{band.year}}
    oninput={{action "yearDidChange" value="target.value"}} />
</div>
<div class="form-group">
  <label for="band-rating">Rating</label>
  {{star-rating id="band-rating" item=band rating=band.rating on-click=(action "ratingDidChange")}}
</div>
<button type="submit" class="btn btn-primary pull-right" {{action "saveBand"}}>Submit</button>

nameDidChange, yearDidChange and ratingDidChange all end up calling the passed in closure action, on-update, with the name of the property that has changed and its new value. This calls updateBandProperty in the controller we already saw:

import Ember from 'ember';

export default Ember.Component.extend({
  tagName: 'form',
  band: null,
  errors: null,
  "on-update": null,
  "on-save": null,

  actions: {
    saveBand() {
      this.attrs['on-save']();
    },

    nameDidChange(value) {
      this.attrs['on-update']('name', value);
    },
    yearDidChange(value) {
      this.attrs['on-update']('year', value);
    },
    ratingDidChange(params) {
      const { rating } = params;
      this.attrs['on-update']('rating', rating);
    },
  }
});

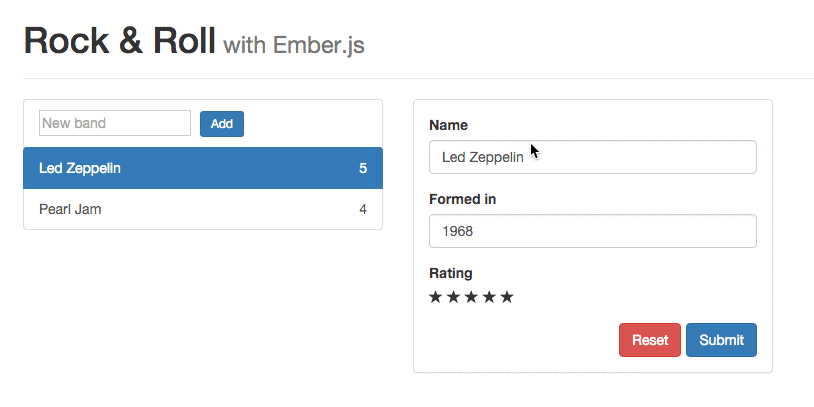
From the outside, the app works just as before. The band name changes in the list as we edit it in the text field:

One-way bindings in action

However, we know that under the hood our code took control of propagating data changes. We have undone the string that kept the two sides (two components) tied strongly together. In the third and final iteration, we’ll leverage that to move validation where it belongs and add a micro-feature.

Take 3: 1WAY Deluxe™

Now, for the cool part. Now that we’re free to change band-related properties on the component without affecting the properties of the band object (the model of the controller), we no longer have a shared state.

The first thing we’ll do is to move the validation into the band-form component. band-form will be also less chatty. It will only send property updates when the form is submitted. That means we don’t need to pass in the errors object or an on-update action:

<div class="panel panel-default band-panel">
  <div class="panel-body">
    {{band-form band=model on-save=(action "saveBand")}}
  </div>
</div>

That implies that the controller can be really slimmed down to the saveBand action:

import Ember from 'ember';

export default Ember.Controller.extend({
  actions: {
    saveBand(properties) {
      const band = this.get('model');
      band.setProperties(properties);

      return band.save().then(() => {
        console.log("Band is saved");
      });
    }
  }
});

Note how the input field values in the band-form template are now bound to properties on the component as opposed to that of the passed in band object:

<div class={{if errors.name "form-group has-error" "form-group"}}>
  <label for="band-name">Name</label>
  <input type="text" class="form-control" id="band-name" value={{name}}
    oninput={{action "nameDidChange" value="target.value"}} />
</div>
<div class="form-group">
  <label for="band-year">Formed in</label>
  <input type="text" class="form-control" id="band-year" value={{year}}
    oninput={{action "yearDidChange" value="target.value"}} />
</div>
<div class="form-group">
  <label for="band-rating">Rating</label>
  {{star-rating id="band-rating" item=band rating=rating on-click=(action "ratingDidChange")}}
</div>
<div class="form-group button-panel">
  <button type="submit" class="btn btn-primary pull-right" {{action "saveBand"}}>Submit</button>
  <button type="button" class="btn btn-danger pull-right" {{action "reset"}}>Reset</button>
</div>

Little else has changed but a second button, Reset, already gives you a taste of things to come. Let’s see the component definition:

import Ember from 'ember';

export default Ember.Component.extend({
  tagName: 'form',
  band: null,
  "on-save": null,

  name:    null,
  year:    null,
  rating:  null,
  errors:  null,

  // Validation code comes here, copied verbatim from the controller

  resetOnInit: Ember.on('init', function() {
    this.resetFromBand();
  }),

  resetFromBand() {
    ['name', 'year', 'rating'].forEach((field) => {
      const valueInBand = this.get('band').get(field);
      this.set(field, valueInBand);
    });
  },

  actions: {
    saveBand() {
      this.validate();
      if (this.get('hasErrors')) {
        return;
      }

      return this.attrs['on-save'](this.getProperties(['name', 'year', 'rating']));
    },

    nameDidChange(value) {
      this.set('name', value);
    },
    yearDidChange(value) {
      this.set('year', value);
    },
    ratingDidChange(params) {
      const { rating } = params;
      this.set('rating', value);
    },
    reset() {
      this.resetFromBand();
    }
  }
});

I cut out the code responsible for validation since that has just been brought over from the controller.

The interesting stuff happens in resetFromBand which is both called when the component comes to life and when the Reset button is clicked. It copies the name, year and rating properties of the band onto those of the component, effectively resetting them to their original value. That’s the only reason we still need to pass in the band object into the component.

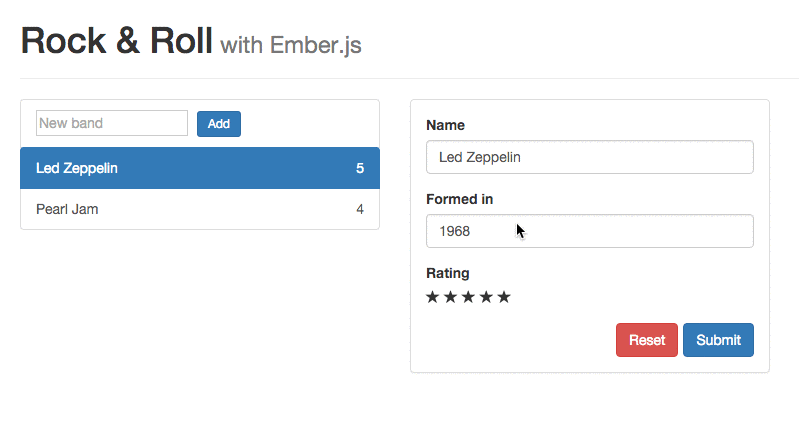
Also notice how the name and the rating are not updated on the band object as we interact with the form:

1WAY Deluxe in action

Having the data validated by the form acts as a guard. The save action is only triggered if the data was found to be valid. It is only then that the form’s data will overwrite that of the band object. Data flows both ways but in a very controlled way.

To take this further, thanks to closure actions, we could even display an error in the band-form component if the save operation fails on the controller:

export default Ember.Component.extend({
  (...)
  actions: {
    saveBand() {
      this.validate();
      if (this.get('hasErrors')) {
        return;
      }
      const properties = this.getProperties(['name', 'year', 'rating']);
      return this.attrs['on-save'](properties)
        .catch((error) => {
          this.set('errors.base', error.get('message'));
        });
    },

    (...)
  }
});

UPDATE

Take 4: 1WAY Deluxe™ without input cursor wackiness

The above 1WAY Deluxe™ has a bug that Robert Jackson pointed out and that I did not realize while building the demo app. The cursor in the text field always jumps back at the end of the text after each change:

1WAY Deluxe input wackiness

During the Glimmer rewrite he spend a lot of time tracking down that bug, the result of which is the ember-one-way-input Ember addon.

So that’s what we should use instead of regular input tags. We first install the addon with ember install ember-one-way-input. That gives us a one-way-input component that takes an update action which will be triggered at each change of the input’s value (more precisely, on both change and input events).

Let’s replace the input tags in the component’s template:

<div class={{if errors.name "form-group has-error" "form-group"}}>
  <label for="band-name">Name</label>
  {{one-way-input type="text" class="form-control" id="band-name" value=name
    update=(action "nameDidChange")}}
</div>
<div class="form-group">
  <label for="band-year">Formed in</label>
  {{one-way-input type="text" class="form-control" id="band-year" value=year
    update=(action "yearDidChange")}}
</div>
<div class="form-group">
  <label for="band-rating">Rating</label>
  {{star-rating id="band-rating" item=band rating=rating on-click=(action "ratingDidChange")}}
</div>
<div class="form-group button-panel">
  <button type="submit" class="btn btn-primary pull-right" {{action "saveBand"}}>Submit</button>
  <button type="button" class="btn btn-danger pull-right" {{action "reset"}}>Reset</button>
</div>

Nothing else needs to change for the cursor position weirdness to go away:

1WAY Deluxe input without cursor wackiness

Thank you to Robert Jackson and Toran Billups for spotting this and pointing me to the solution.

Conclusion

I’m really excited and curious about how many things this makes possible. As I said in my presentation, we’re (but surely: I am) only figuring out both the possibilities “managed” one-way bindings open up and the best way to work with them. So if you have thoughts or insights, please do share them in the comments.

NOTE: I published the demo app of this post on Github.

Rock and Roll With Ember 2 Just Went Live

The 2nd edition of my critically acclaimed book, Rock and Roll with Ember.js, has just been published. The number 2 does not only denote the 2nd edition but also the fact that it runs on Ember (and Ember Data) 2.0 and that it will follow the 2.x development path of the framework.

The 2nd edition adds 4 new chapters: Animations, Making an Ember addon, Writing modern JavaScript (ES2015) and Deployment. Here is the complete set list:

  1. Introduction to Ember.js
  2. Ember CLI
  3. Templates and data bindings
  4. Routing
  5. Nested routes
  6. Actions
  7. Components
  8. Controllers
  9. Advanced routing
  10. Talking to a backend - with Ember Data
  11. Testing
  12. Sorting and searching with query params
  13. Loading and error routes
  14. Helpers
  15. Animations
  16. Making an Ember addon
  17. ES2015 - Writing modern JavaScript
  18. Deployment

As many readers have said, keeping the book up-to-date with the latest stable Ember release also makes it a great reference book on current Ember idioms and features.

Oh, and did I mention I am running a 20% discount on all packages until Monday, 10/05, 23:59 PST? There are also a few other goodies in the bag, so I encourage you to check out the book now before prices revert to their normal level.

Select in Ember With Multiple Selection

A few weeks ago I wrote a blog post about how to do a select in Ember 2, that seemed to be popular. I also received good comments about advanced versions of the same problem, namely how the solution would have to change to deal with the case if the items to select from are objects and how to tackle multiple selections. I thus decided to do a Part 2, showing a solution for these cases. Comment are welcome, as always.

Multiple selection with simple strings as items

Let’s tackle the easier problem first, being able to select more than one items, but the items are simple string values. The values will serve both as the value and the content of the options.

I added some extra Bootstrap markup and a list to see which items are selected:

<div class="container">
  <div class="row">
    <div class="col-sm-8">
      <h2>Select some bands</h2>
      <select style="height:100px" class="form-control" multiple onchange={{action "selectBand"}}>
        {{#each bands as |bandChoice|}}
        <option value={{bandChoice}} selected={{include selectedBands bandChoice}}>{{bandChoice}}</option>
        {{/each}}
      </select>
    </div>
    <div class="col-sm-4">
      {{#if selectedCount}}
        <h2>Selected bands ({{selectedCount}})</h2>
      {{else}}
        <h2>Selected bands</h2>
      {{/if}}
      <ul class="list-group">
        {{#each selectedBands as |band|}}
          <li class="list-group-item">{{band}}</li>
        {{else}}
          <li class="list-group-item">No band selected.</li>
        {{/each}}
      </ul>
    </div>
  </div>
</div>

I added the multiple attribute to the select tag to allow multiple selections. Not much has changed from the earlier example. When the user selects an option, whether in a way that clears the earlier selection (simple click) or adds to it (ctrl/cmd + click), the onchange event is fired, and our selectBand handler will handle it. We expect that handler to set selectedBands so that the list of selected bands gets updated correctly. So let’s see the controller:

export default Ember.Controller.extend({
  bands: ['Pearl Jam', 'Tool', 'Long Distance Calling', 'Led Zeppelin'],

  selectedBands: [],

  selectedCount: Ember.computed.reads('selectedBands.length'),

  actions: {
    selectBand(event) {
      const selectedBands = Ember.$(event.target).val();
      this.set('selectedBands', selectedBands || []);
    }
  }
});

For multiple selections, jQuery, aliased as Ember.$, returns an array of the selected options values as the select’s value, so all we have to do is assign this to the selectedBands property. In case nothing is selected, val() returns null, so we guard against transferring this to selectedBands by defaulting to an empty array.

There is one more thing you might have noticed, and that is the include helper in the template. We want to mark the option as selected if its value is included in the selectedBands:

<select style="height:100px" class="form-control" multiple onchange={{action "selectBand"}}>
  {{#each bands as |bandChoice|}}
  <option value={{bandChoice}} selected={{include selectedBands bandChoice}}>{{bandChoice}}</option>
  {{/each}}
</select>

The include helper is not provided by Ember but it is rather easy to write ourselves:

import Ember from 'ember';

export function include(params) {
  const [items, value] = params;
  return items.indexOf(value) > -1;
}

export default Ember.Helper.helper(include);

That is all there is to it:

Multiple selection

Multiple selection with objects as items

This is just a tad more difficult, as we cannot directly have objects as options values. Let’s assume that these objects have a property that identifies them unambiguously (which is a fair assumption to make), usually referred to as id:

import Ember from 'ember';

export default Ember.Controller.extend({
  bands: [
    Ember.Object.create({ id: "1", name: 'Pearl Jam', formedIn: 1990 }),
    Ember.Object.create({ id: "2", name: 'Tool', formedIn: 1991 }),
    Ember.Object.create({ id: "3", name: 'Long Distance Calling', formedIn: 2003 }),
    Ember.Object.create({ id: "4", name: 'Led Zeppelin', formedIn: 1970 })
  ],
  (...)
});

We’ll use the id as the option value and display the name:

(...)
<select style="height:100px" class="form-control" multiple onchange={{action "selectBand"}}>
  {{#each bands as |bandChoice|}}
    <option value={{bandChoice.id}} selected={{include selectedBandIds bandChoice.id}}>{{bandChoice.name}}</option>
  {{/each}}
</select>
(...)

On the controller, we collect the id of each selected band, and if we need to display their names, we simply make the mapping between these two:

export default Ember.Controller.extend({
  (...)
  selectedBandIds: [],

  selectedBands: Ember.computed('selectedBandIds.[]', function() {
    return this.get('selectedBandIds').map((bandId) => {
      return this.get('bands').findBy('id', bandId);
    });
  }),
  (...)
});

bands.findBy is our makeshift store service, which allows us to find an object in a collection by its id. If we used Ember Data, it would become store.findRecord('band', bandId) or store.peekRecord('band', bandId). The only other difference from before is that we set selectedBandIds instead of selectedBands in the action handler:

export default Ember.Controller.extend({
  (...)
  actions: {
    selectBand(event) {
      const selectedBandIds = Ember.$(event.target).val();
      this.set('selectedBandIds', selectedBandIds || []);
    }
  }
});

Rock and Roll With Ember 2 Is Coming Soon!

tl;dr

I will publish a second, extended edition of my book, Rock and Roll with Ember in about two weeks, at the end of September. Here is what you need to know:

  • I make the same promise as with the current edition: you buy it once, you get all updates for free until 3.0 comes out
  • 4 extra chapters are added about advanced Ember topics, bringing the number of chapters to 18
  • There will be a short launch period where the book packages are offered at a discount.

To be in-the-loop about the launch and know about the launch discount, sign up below, at the end of the post. Read on for more details.

The short past, present and future of Rock and Roll with Ember

Almost exactly 7 months ago, I published my book, Rock and Roll with Ember.js, that helps people learn the glorious framework. Ember has since went through quite some changes and I kept the book up-to-date with roughly an update each month.

Ember 2 was released about a month ago, on the 13rd of August. True to the “stability without stagnation” philosophy, the 2.0 release did not contain any new features but dropped a lot of deadweight, API methods and syntaxes that had been deprecated somewhere along the 1.x process.

Thanks to the transparency of the road ahead through RFCs and discussions on other forums, it can already be clearly seen that the 2.x series will bring a great deal of new and fascinating features. Routable components, angle-bracket components and contextual lookup in components are some of the bigger things that we can expect on the road to 3.0. The expected simplifications (for example, routable components replacing controllers) will come with major changes in how one writes an idiomatic app in Ember 2.

I’ve been following along the 1.x series with fascination and a keen eye to apply the changes to my book and the included application. I want to do the same along the Ember 2.x line and thus I hereby announce the second edition of the book, Rock and Roll with Ember 2!

Free updates policy

To clarify, with Rock and Roll with Ember 2, I intend to follow the “book development and release” process of the first edition of the book that I’ve now named “Buy once, get all updates for free (until the next major version)”. I assert that if you buy any of my book packages, you get all subsequent updates for free, until 3.0 lands (which is probably 12-18 months away. Geez, do I really want to do that? :) ).

New content

Keeping the book’s current content up-to-date is not all. The second edition will contain 4 extra chapters on some advanced topics (Animations, Making an Ember CLI addon, Deployment and ES2015 & computed macros) bringing the total chapter count to 18 (the Getting ready for Ember 2.0 is retired).

Further content changes are expected as Ember 2 evolves (see above for what can already be known about these changes), so the content on launch day will by no means be the final content of the book. It will constantly improve and be kept in-sync with the latest stable 2.x version of Ember.

When does it launch?

Very soon, probably in two weeks, mark the date (with a pencil, for the moment): September 30, 2015.

Stand ready, Rock and Roll with Ember 2 is coming to a virtual bookstore near you!

Rock and Roll With Ember.js v1.13.9 Is Out

I have just released another update to the Rock and Roll with Ember.js book, keeping it in sync with Ember 1.13.9. On top of that (mostly on top of that, since there weren’t as many things to do for the Ember upgrade), I added some content, removed some other ones, fixed a few wrong paths in code comments, clarified a few code lines to help people build the app along, and the like. The usual stuff, quoi.

Here are the bigger chunks:

  • Extended the Testing chapter with a (controller) unit test. I removed the component’s unit test in an earlier update (integration tests are vastly superior for components) but now realized unit testing was missing.
  • Switched to a dashless helper, capitalize instead of capitalize-words. Ember 1.13.0 and up auto-register helpers with and without dashes, so there is no need for the more verbose form.
  • Fixed a few places where the updateRating action was still in the route. When I switched to a closure action, I had to move the action handler to the controller but missed a couple of places in the subsequent chapters.
  • The epub version had two missing code snippets due to bad formatting (thanks to @morganick)

There are a few other minor fixes, the whole list can be found in the Github issues repo

I want to thank Andrew Davison who did most of the error reporting for this update. Thank you, Andrew!

Stay tuned for more goodies early next week, or sign up below so that you don’t miss any in the future.

Complex Component Design in Ember.js - Intro

This is the intro of the Complex Component Design series. Here are the posts in the series:


The title would probably better be “Somewhat Complex Component Design in Ember.js” but any title including ‘Somewhat’ rules out pompousness. I therefore don’t claim that the series of blog posts I intend to start here will represent the pinnacle of component design in Ember. There definitely are and definitely will be more complex component structures and scenarios.

The component developed in the series is one that autocompletes as the user starts to write the input and allows selecting from a fixed set of options. Nothing extraordinary but complex enough so that the design/interaction principles can be applied and explained while developing the component.

Important disclaimer: I am not an expert on component design (which, it seems to me, is quite a complex topic). I got intrigued by it thanks to Ryan Florence and his talks and learned most of the basics from him. My choice of component probably also has to do something with Ryan. He developed the ic-autocomplete component from which I took several ideas, sometimes simply copying the implementation.

Rationale

So you probably ask: why reinvent the wheel? Why develop something that is already done and not something new?

First of all, I (and science says most of us) learn best by doing. I wanted to use an example where I already have a sample implementation but also understand why the original implementation did things as it did and see whether I can make the component simpler or more robust. I wanted to face the problems, to feel the pain of doing things a certain way, and find solutions for typical, recurring problems.

It’s also important to remember that when Ryan developed their autocomplete component, there were no block parameters, no closure actions and no direct attribute bindings. One still had to resort to observers in several cases. Two-way bindings were still in, and the de-facto way of communication between pieces of a component structure.

Ember has come a long way since then and its components converged toward those of React in its reactive, “rerender everything” approach. Potentially some of the ideas explained in the series can be applied to React and other libraries, too, and thus might prove useful to more people.

So many words, so little code

To have something (almost) tangible in this first intro post, too, let me show you how one would interact with the finished(?) component. If you have read my earlier posts or my book, it will come as no surprise that I use it here to select a great musician from a defined set of them:

Selecting an
artist

This short intro and the demo have hopefully whetted your appetite and you’ll join me for the next part of the series:

How to Do a Select (Dropdown) in Ember 2.0?

When the select view was about to be removed from Ember, a lot of people -myself included- wondered how it was going to be replaced. My bet was on a ‘select component’, after all, views should be transformed into components, right?

Then I saw this gist from Edward Faulkner:

<select onchange={{action (mut vehicle) value="target.value"}}>
  {{#each vehicles as |vehicleChoice|}}
    <option value={{vehicleChoice}} selected={{eq vehicle vehicleChoice}}>{{vehicleChoice}}</option>
  {{/each}}
</select>

I did not understand half of it, so I dug down to see how the pieces come together. In this short post, I want to explain what I have found out.

Solve a simpler problem

A great mathematician, George Polya, wrote a book in 1945 called “How to Solve It”, in which he puts down a framework for solving mathematical problems. One (probably more) of his recommendations can be applied to software development, too: Solve a simpler problem.

Heeding this advice, we’ll first tackle a more mundane problem and in the second round, we’ll solve the original riddle.

Let’s assume Edward had written the following:

<select onchange={{action "selectVehicle" value="target.value"}}>
  {{#each vehicles as |vehicleChoice|}}
    <option value={{vehicleChoice}} selected={{eq vehicle vehicleChoice}}>{{vehicleChoice}}</option>
  {{/each}}
</select>
1
2
3
4
5
6
7
8
9
10
11
import Ember from 'ember';

export default Ember.Controller.extend({
  vehicle: null,
  vehicles: Ember.String.w('Tesla Chrysler Toyota'),
  actions: {
    selectVehicle(vehicle) {
      this.set('vehicle', vehicle);
    }
  }
});

This is easier (as in: more familiar) but there are still a few things that might need explanation. First, before 1.13.3, event listeners on browser events could not trigger Ember actions like that:

<select onchange={{action "selectVehicle" value="target.value"}}>

What this does, is that when the selected value of the dropdown changes, it fires the onchange listener we added on the <select> which results in calling our action handler, selectVehicle. The handler just updates the vehicle property of the controller. This will mark as selected the dropdown option the user picked due to the selected={{eq vehicle vehicleChoice}} term.

(eq comes from a great little Ember addon called ember-truth-helpers. It returns true if the two parameters are equal).

Since there is no two-way binding set up between the selected option of the dropdown and the controller property (vehicle), this needs to be done using a DOM event listener (onchange) and updating in the action handler. That’s exactly what happens in the selectVehicle action handler.

So far so good, let’s move on.

Solve the original one

Wait a minute. How did selectVehicle receive the selected vehicle choice (e.g Toyota) when the {{action}} helper did not specify any parameters?

When the browser calls an event listener, it passes it an event object which would become the first parameter of selectVehicle. However, selectVehicle does not receive the event but the actual value of the selected option, how does that come about? The missing link is a lesser-known option of the action helper, value. The property passed to it is read off of the first parameter of the handler and then replaces it. In our example, target.value is looked up on the event object, which is exactly the value of the select option that triggered the onchange event.

Ok, only one thing left.

The original example had this line:

<select onchange={{action (mut vehicle) value="target.value"}}>

instead of the more familiar:

<select onchange={{action "selectVehicle" value="target.value"}}>

What mut does here is that it allows updating the passed property, so when the action is called, vehicle is set to the passed value, the value of the selected option. That is it, we solved the riddle.

The same implementation pattern can be used to update the properties related to checkboxes, input fields and radio buttons. This new way of doing things takes a while to get used to, but we’ll see more and more of it with one-way bindings becoming best practice.

(By the way, my PR to add a section about the actions helper’s value option to the guides was merged yesterday, so hopefully more people will know about it.)

Wait, there is more!

This post received a lot of comments, some of which are inquiring about more complex use cases. I decided to do a screencast where I implement some of these. You can get it by signing up below:

Rock and Roll With Ember.js v1.13.7 Is Out

I am happy to announce another update to the Rock and Roll with Ember.js book, in line with the latest Ember CLI, 1.13.7. Book customers have already received the updated version, here is how it got better:

  • Update to Ember CLI 1.13.7
  • Upgrade to Ember version 1.13.6
  • Explain better the difference between sync and async test helpers and how these latter work in Ember
  • Make the stubs for creating bands and songs not take an id, to be similar to how the actual API works
  • Update section about Ember Data being in beta
  • Show what the custom submit async helper does when it first appears
  • Remove unit tests for components as ember generate component-test now generates integration-style tests
  • Extract the wait helper used across two examples (for showing loading routes/templates)
  • Update jsbin in the Templates chapter to use the latest Ember version
  • Fix importing the capitalizeHelper in the code snippet in the book
  • Last but not least, the pdf version of the book now has page numbers and a nice, expandable table of contents so you can jump to any chapter or section from anywhere:

    Collapsable TOC and page numbers

    I know, it seems extremely simple to have them from the start but the way the pdf was generated did not allow for this so we had to find another way. I again worked with Almudena Garcia on these design changes and I whole-heartedly recommend her if you have some front-end (HTML & CSS) tasks to get done.

There are a couple of other, smaller changes and you can see the whole list in the issues repo. Or you can buy the book here.

Rock and Roll With Ember.js v1.13.3 Is Out

It’s Friday and if it’s (every 2nd-6th) Friday, it’s Rock and Roll release day!

Book version 1.13.3 is rolling out as we speak (ok, we don’t speak and you probably read this later, but you get the point) which contains the following changes:

  • Upgrade to Ember version 1.13.3 (the book is in lockstep, too!)
  • Update to Ember CLI 1.13.1
  • Extended the Components chapter with closure actions.

    Closure actions are an awesome new way to fire/handle actions introduced in 1.13 and so it has to be in the book!

  • Extended the Testing chapter with component integration tests.

    Integration tests make component tests super simple to set up and so much more descriptive than unit tests. Our beloved star-rating component is now tested by the shiny new integration tests.

  • Get rid of needs in the controller.

    There was one instance where I used this to get a nice placeholder text. As a preparation for Ember 2.0 where needs is going the way of the dodo, I removed that nasty needs.

  • Specify the band-songs relationship as sync.

    Starting from 2.0, Ember Data relationships are assumed to be asynchronous unless otherwise specified. In the Rock & Roll application, we sideload the songs with the bands, so adding a { async: false } option to the relationship was in order.

  • A few CSS fixes, one of them thanks to lonekorean

The whole change list is observable here.

Hoist the sails, Ember 2.0 (and with it, Rock and Roll with Ember 2.0) is on the horizon!