Today marks the sixth release of my book, Rock and Roll with Ember.js, and
brings it in sync with Ember 1.13. The book follows along the development from
scratch of an Ember application, and chapter by chapter and explains concepts in
the process.
As I have promised, the book is kept up-to-date with the latest stable Ember
version. That implies both using idiomatic Ember and not using deprecated
syntaxes or APIs.
Now that the versioning of Ember Data is in lockstep with that of Ember, I
considered it important to update to the latest Ember Data, too, and will
strive to do so in future releases, too.
Here are the major things I updated for the 1.13 release:
Use this.route instead of this.resource in the router map as the latter is now deprecated.
Use Ember.computed and Ember.on instead of the Function prototype
extensions, property and on as extending the Function prototype is
consired a poor practice.
Update the “Getting ready for Ember 2.0” chapter as most things are clear now
for the 2.0 release. As I give particular examples for each deprecation, this
chapter can also serve as an update guide for 1.x Ember applications.
Use the new Ember Data find methods, namely store.findAll and
store.findRecord. Before, both fetching a collection and a single record
used store.find.
As usual, there are also smaller improvements and fixes and you can find the
whole list in the errata/issues repository for the book, assigned to the release milestone.
I wrote an article called “The Top 8 Most Common Ember.js Developer
Mistakes” for Toptal that just went live on their blog. As the name
suggests, it describes the typical pitfalls beginner, and sometimes advanced,
Ember developers make with a mitigation strategy for each of them. I am quite
happy about how it turned out and suggest you give it a read.
Also, it turned out to have more than 2500 words so I thought it might be
convenient for you to have it as a pdf. It spans 13 pages and you can get it
right here below by providing your email address to send the paper to:
I started writing my book, Rock & Roll with Ember.js, on July 18, 2014, exactly
7 months ago (More precisely, I prepared some drafts from early chapters most of
which I ended up rewriting before that, but who doesn’t like a good story?).
Ember is said to be hard to learn. Developers who are new to the framework hit
a wall and can’t easily find out how all the pieces fit together.
My own experience tells me that Ember has a small number of core concepts that
you have to grok to be able to tame the learning curve. Once you understand
these key ideas behind the framework’s design, you will fly over that wall and
see the green meadow filled with flowers and bunnies.
You will build Ember applications with confidence and - if you are like me -
you will love building them.
Read it and build it!
My book also has a concept, and a very pragmatic one at that.
In the book, we are building an application, chapter by chapter. As we
progress, we are adding new features to the application, introducing new
Ember concepts that are needed for implementing the feature.
When a list of bands need to be displayed alongside with the songs of the
selected band, we reach for nested routes. When we need a widget that displays
stars for the songs, we introduce components. When we want to show the user
that loading data from the backend is in progress, we learn about loading
routes.
Set List
The book currently has the following chapters:
Introduction to Ember.js
Ember CLI
Templates and data bindings
Routing
Nested routes
Actions
Components
Controllers
Advanced routing
Talking to a backend - with Ember Data
Testing
Sorting and searching with query params
Loading and error routes
Helpers
Getting ready for Ember 2.0
I say ‘currently’ because I will definitely have to change some chapters as
Ember evolves (To give an example, Controllers will probably become Routable components).
A reference book and a reference application
Ember moves rapidly towards version 2.0. As each minor version is released, it
brings new syntaxes and deprecates old ones. Even though the Ember Core team
takes extreme care to ensure a smooth upgrade process, it is easy for an
application to lag behind, having a few deprecations here and there and not
using the shiny new tools.
The motto of the Ember 2.0 roadmap is “Stability without Stagnation”, that old
syntaxes and practices should vanish gradually, giving ample time for developers
to update their applications. At the same time, Ember should not stagnate, it
should introduce new features.
I adhere to this motto, but, more importantly, my book does, too.
I want the book and the Rock & Roll application to be up-to-date with the latest
stable Ember version and not have any of the deprecations. What that means in
practice is that if you buy one of the packages, you will most likely get book
updates after each 1.x release. And at no extra cost to you until 2.0 ships!
A bonus deal you will definitely like
When you buy one of the packages you also get access to an awesome deal
from Divshot, a company that provides static hosting for your Ember apps.
Wait, there is more! To celebrate that the book has finally seen the
light of day, there is a 25% discount on all packages.
This offer expires on Sunday, February 22, at 23:59 PST, so grab yours now!
Acknowledgements
I am indebted to all of you who have pushed me through the finish line, either
by praising my screencasts, blog posts and review copies of my book, retweeting
my marketing tweets, giving valuable feedback that made the book better or
simply by pointing out typos in the text.
I would also like to thank you to the Ember Core team whose relentless work
makes Ember better every day. You are putting so much time in, it’s almost
insane. It’s kinda obvious but without your contributions, this book would not
exist.
EmberFest 2014 ended a week ago and I already feel nostalgic. It
was a great event with great people and you could feel the excitement about
Ember in the air and in all conversations. It was almost single-handedly
organized by Joachim Haagen-Skeie for which he deserves huge kudos.
It was really great to associate real people with twitter avatars and have
fascinating conversations about various topics that included the Ember
Inspector, the difficulties in building a build tool and even Firefox OS.
The functional paradigm making a headway into Emberland
One thing that struck me about Ember initially is that it seems to rely heavily
on (shared) state. Some (most?) of that is inevitable given Ember being a
performant framework that runs in the browser and is written in Javascript.
None of these facilitates ditching (or minimizing) state and go with a
functional, stateless approach.
On the other hand, I really came to cherish the simplicity of the
functional paradigm and have been gravitating towards languages that allow this
(Clojure was, and still is, my favorite). So I added a mental
note about my two favorite things being at such a great distance from each other
and moved on.
One theme of the conference and the hallway talks, however, is how Ember
embraces the functional, immutable approach where it makes sense to. It might
have something to do with my confirmation bias, but let me cite the examples
nevertheless. Paul Chavard had a talk on his using immutable data
structures in Ember. Jo Liss revealed how Broccoli uses a
“rebuild-from-scratch” approach instead of trying to find out which assets to
rebuild at each modification. Finally, Alex Matchneer, aka. machty, prolific
Ember and router.js contributor had a presentation on React vs. Ember
at EmberNYC which you should go read. His last slide has a bullet-point
that states: “Don’t be surprised if Ember adopts DOM-diffing”.
It would be an understatement if I said I’m happy to see the functional world
coming to Ember.
Promises
I had a talk at the conference called “Don’t call me back - How Ember uses
promises and how you can, too”. As it usually happens, in doing research for the
talk, I learned a lot not just about promises but about other topics, too. This
time, it was the (in)famous run loop I stumbled across on several
occasions so I am really happy I know a lot more about that beast now. You can
find the slides of my presentation below.
I might even do another talk “How Ember uses the run loop and how you should
probably not”, or something to this effect.
EmberFest 2015
The greatest thing about EmberFest was its vibe. I saw the tweets coming
in from EmberConf this March and the post-conf blog posts
about the awesome community and how one could feel the excitement that we are
building apps with a tool that is new and hot now but is probably going to be
the framework of choice for many in a few years. It is definitely a fascinating
world to live in.
I’ll certainly be there at EmberFest 2015, so hopefully see you there!
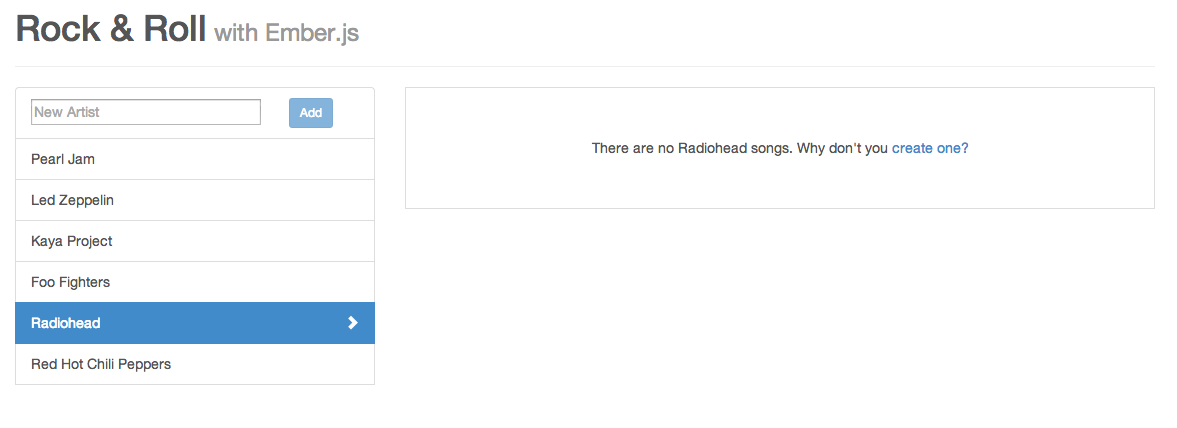
There is a somewhat subtle bug in the current version of the Rock & Roll with
Ember app. If you start to create a song for an artist that does not have one
and then switch to another one, the song creation process does not need to be
restarted by clicking on the “Why don’t you create one?” link. Also, if you’ve
already partially inputted the name of the song for the first one, it stays
there for the second artist:
The above behavior was brought to my attention by DavidLormor, an astute reader and watcher of my screencasts.
In some circumstances it is desirable for the result of some user interaction to
linger between route transitions but in other cases it is not. I put the
current example firmly in the latter camp and thus consider the above a bug.
Let me explain what causes this behavior and then provide a simple solution to fix it.
Repeat after me: controllers are singletons
Controllers in Ember are singletons. Controllers in Ember are singletons.
Controllers in Ember are singletons.
When the user leaves a page and goes to another one, the controller is not
torn down. It lives on, keeping its properties.
This makes total sense for a framework that aims to be a tool for creating
long-lived, rich-client side applications but is something to watch out for
when you develop Ember applications.
If you have a long background in back-end development, like yours truly,
it is especially easy to fall prey to this, as you could see.
Same controller, different model
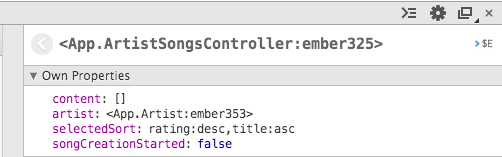
Initially, when the applicaiton is loaded, the songCreationStarted property
of the controller is set to false. When the user clicks the “create one” in the
“Why don’t you create one?” blurb, it is set to true and thus the text input
field appears to allow adding a new song.
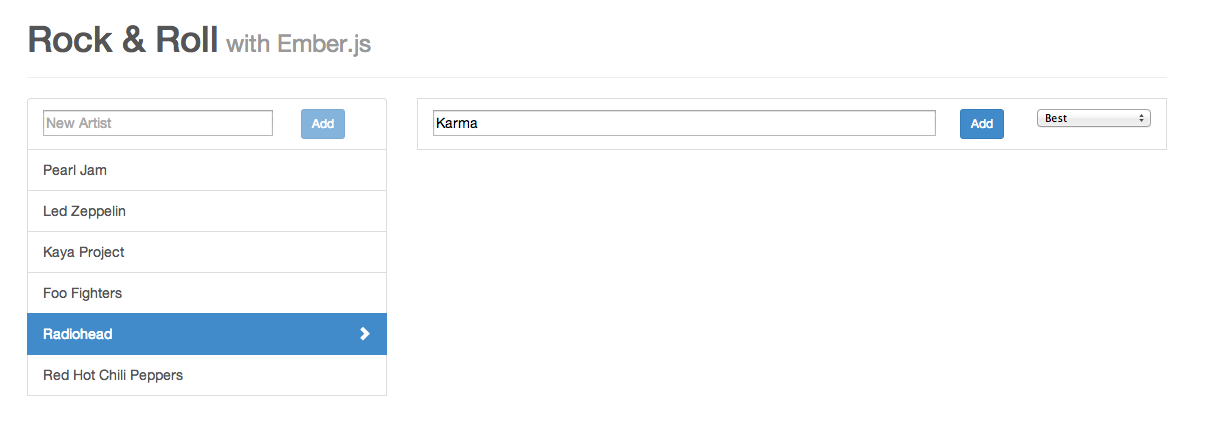
Now comes the tricky part. If the user then decides to go to a different artist,
she clicks the name of another artist in the sidebar. What happens? A transition
is made from one ArtistSongsRoute to another ArtistSongsRoute. The artist
is going to be different but the same ArtistSongsController is used.
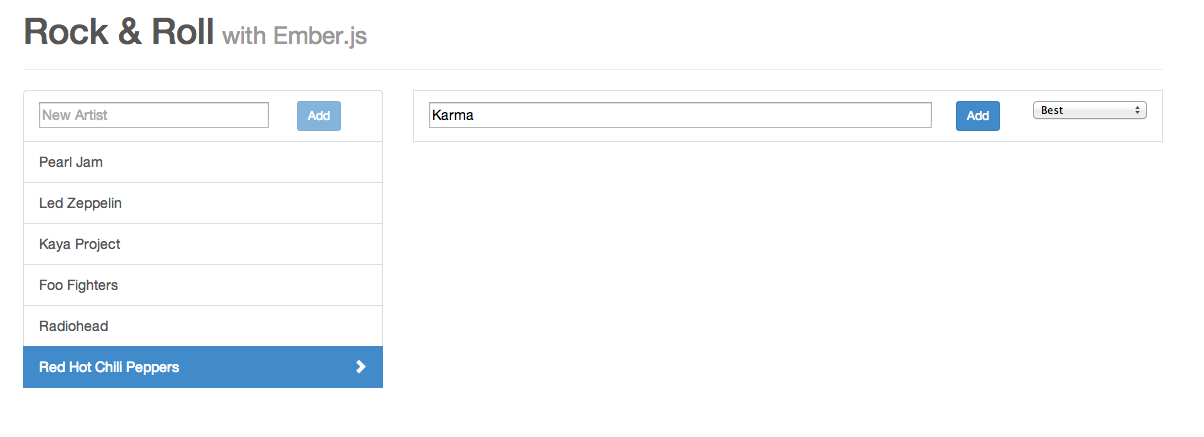
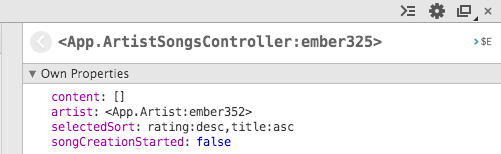
To prove my point, here are two screenshots of the Ember Inspector’s sidebar.
The first one is before, the second one is after the transition between
/artists/radiohead/songs and /artists/red-hot-chili-peppers/songs:
You can see that the controller is the same Ember object but the value of the artist property changes.
Understanding the problem
When the transition is made between the two artists, the artist object is
changed and consequently any data bound to the artist (and the artist property
of the ArtistSongs controller) is going to be rerendered but, since the
controller instance is not changed, unrelated data will stay unchanged on
screen.
What happens in the code? If you take a look at the template, you see that the
text input field is shown if canCreateSong is true:
canCreateSong is defined in the controller and is true if either
songCreationStarted is true or if there are already songs. Since
songCreationStarted has just been set to true by the enabledSongCreation
action (and the controller instance is not changed) when the user clicked the
“create one” link for the first artist, canCreateSong stays true and the
text field stays visible:
And that totally works. However, I prefer placing this “resetting” code in the
controller, probably because it is strictly controller-related and also because
I can make the code really telling there:
The observes function property extension will run the artistDidChange code
every time the artist property of the controller changes and that is exactly
when we need to clear the title and allow the song creation process to be
restarted. Nice, clean and does exactly one thing.
Note: The latest version of the code that contains these changes is available on Github.
Model Dependent State - UPDATE
It turns out I stumbled into something substantial. As Luke Melia points out below in the comments (thank you, Luke!),
the above problem has been under consideration for a while.
Alex Matchneer, a member of the Ember core team gave a presentation at EmberConf in which he explains that there is a missing
primitive.
He calls it “Model Dependent State” and it is what would decide under what
conditions a certain controller property is “sticky” (whether it retains its
value when you change the model of a certain controller or not).
Here is the part where he begins to talk about Model
Dependent State.
When an Ember app is being loaded at first, the user sees a blank screen. When
transitioning between two routes and loading data to render for the destination
template, there is no indication that something is happening and thus the user can
be perplexed. Ideally, loading data happens fast enough so that users barely
notice the blank screen or freeze, but web apps do not always behave ideally.
If you have read some of my other articles on Ember, you will not be surprised
to hear that there is a splendid solution for this problem and that it is based
on a convention.
Unresolved promises
The model hook of routes is the canonical place to fetch data needed
to render the corresponding template. When a promise is returned, execution is
blocked until that promise is resolved (or rejected). That is the period during
which the application seems unresponsive. When starting up the application,
this can even mean that the user only sees a blank screen. Since data is fetched
asyncronously, not even the spinner in the tab title is going to spin.
The user may just close the tab and go on with her life. We can’t let that
happen and unsurprisingly Ember has a convention-based solution that is easy to
work with and customize.
Beautiful, reusable conventions
We saw how each resource route (and thus each route level) creates an
outlet for the level below to render content in. Let’s take a look at the routes
of the application to see how that plays out:
The outlet defined in the (top-level) application template is going to be filled
in by the content rendered by the first-level templates (in this case, artists).
The artist template also defines an outlet into which content is rendered by
the routes below the artist resource. In this case, there is no common markup
for a single artist so the template only defines the outlet:
The ingenious thing about indicating that loading data from the backend is
happening is that it leverages the “nested routes, nested templates”
architecture explained above.
When the model hook of a certain route returns a promise that is not resolved, a
so-called loading template at the same level as the route is going to be
rendered.
When loading the list of artists in the artists route, a loading route at the
same level is going to be activated. That, by default, means a top-level loading
template is rendered.
Consequently, all we need to do is to put into that template what we want the user to see
while data is being fetched. Currently that is what she sees in that scenario:
You think we can beat that?
Top-level loading template
The convention says that the loading route (and thus template) should be the
sibling of the route we define it for and should be called loading.
The loading template for the artists route should consequently be called
loading:
<script type="text/x-handlebars" data-template-name="loading">
  <div class="loading-pane">
    <div class="loading-message">
      Loading stuff, please have a cold beer.
      <div class="spinner"></div>
    </div>
  </div>
</script>
Let’s inspect what our app looks like while loading data from the backend:
Nice, but it gets nicer still.
Loading route for the songs
We can now descend a couple of levels and make a loading template for when the
songs of a certain artist are being fetched.
Let’s take a look at the “routing table” to see what that template should be
named:
The loading route should be the sibling of the route under consideration.
In this particular case, this latter is artist.songs and thus the loading
template should be named artist.loading:
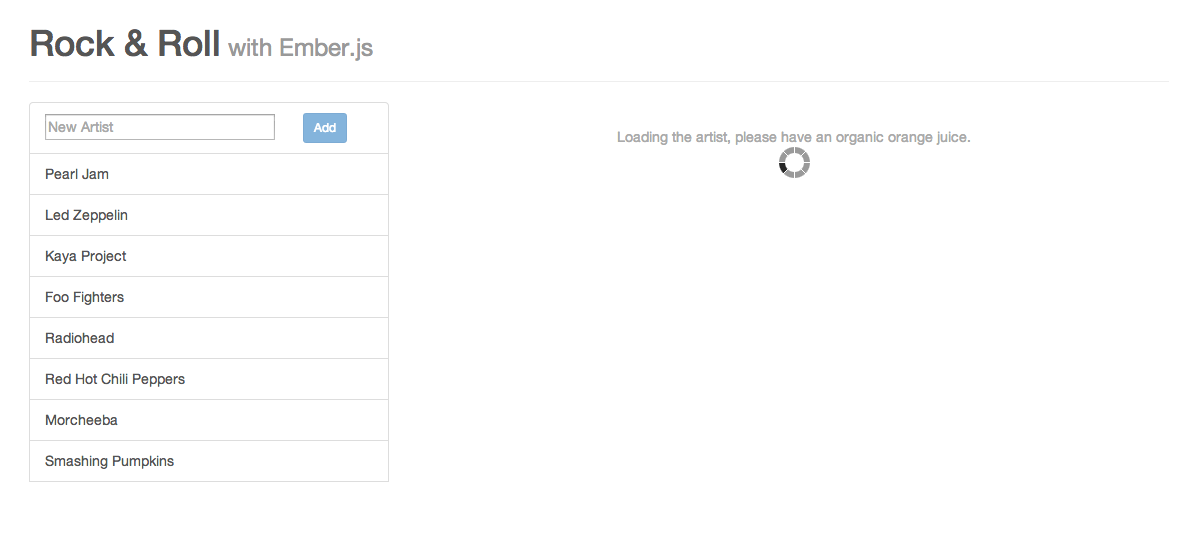
<script type="text/x-handlebars" data-template-name="artist/loading">
  <div class="loading-pane">
    <div class="loading-message">
      Loading the artist, please have an organic orange juice.
    </div>
    <div class="spinner"></div>
  </div>
</script>
Customizing loading route behavior
More precisely, what happens when entering a route where one of the model hooks
returns an unresolved promise is that a loading event is fired on the
route.
We saw above that the default implementation is to look up a route at the same
level as the route itself and render the corresponding template.
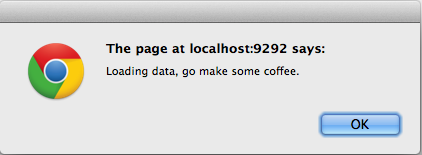
However, this behavior is customizable. For example, we can pop up an alert box
in 1993-style, telling the user she needs to wait.
Below, I do that for the top-level artists route:
123456789101112
App.ArtistsRoute=Ember.Route.extend({model:function(){returnsomeDataThatTakesTooLongToFetch();},(...)actions:{loading:function(){alert("Loading data, go make some coffee.");}}});
It works:
Another thing we can do is to render another loading template:
<script type="text/x-handlebars" data-template-name="working">
  <div class="loading-pane">
    <div class="loading-message">
      I work hard while you play hard.
      <div class="spinner"></div>
    </div>
  </div>
</script>
Which also just works:
Since handling the loading state happens in the route, the most powerful piece
of Ember architecture, the possibilities are many.
Why I love this solution and why you should, too
In summary, let’s see what Ember’s solution of indicating the loading of data
brings to the table:
It uses a convention to eliminate boilerplate and spare you from having to
come up with your own solution.
It allows different markup and text for the different “slow” parts. By
default, each loading template will be rendered exactly where the data would
be rendered.
If this default behavior does not suit your taste or needs, there are several
ways to tweak it, in well-defined ways.
Note: The latest version of the code that contains these changes is available on Github.
One of the outstanding features of Ember.js is that all things related to URLs,
including going back and forth in browser history, just work. This is something
people got used to with “classical”, server-side applications and that several
other client-side frameworks lack.
In this post, I am going to focus on a browser history feature, replacing
entries in it as users navigate between routes instead of adding to it.
Navigating between routes in Ember
If either the link-to template helper or the route’s transitionTo method is
used to move between routes (and thus URLs), a new entry is going to be added to
the browser’s history. That is fine most of the time but sometimes the desired
behavior might be replacing the current entry.
Taking the example from the guide, if one is paging through the comments made on
a photo where each one has its own route, we probably do not want these comment
URLs to clutter the history. Similarly, we don’t want the user to land on these
URLs when she hits the Back button in the browser.
Using the link-to helper
All that needs to be done is adding the replace=true option to the link-to helper.
So if the link that takes you to the next comment is written like this:
The canonical way to go from one route to another is route.transitionTo. If
flipping between comments of a photo was implemented as an action in the route,
the action handler would have the following line:
1
this.transitionTo('photo.comment',nextComment);
To make that replace the current history entry, this becomes:
1
this.replaceWith('photo.comment',nextComment);
replaceWith takes the exact same parameters as transitionTo.
In the controller
As Jacques Crocker points out in his comment
below, I missed the case where we want to transition to another route, replacing
the current item in the history, from inside a controller.
The document title serves as a quick and concise way to identify web pages. It
gets displayed in search results and bookmarks and allows the user to see at a
glance what content she has open in each tab.
Therefore it is important to have descriptive document titles in our web
applications, whether they get rendered on the backend or set in the client app.
In the following short post, I’ll focus on showing how to do that with Ember.
Setting the title property
The way to set the document title from the browser is to just assign a
value to the title property of the document:
1
document.title="1 mind-blowing way to set the title for your html document";
Or, from jQuery:
1
$(document).attr('title',"1 mind-blowing way to set the title for your html document");
Having context-aware titles
For our document titles to be really useful, it would be great to have some
kind of information from the page’s content be reflected in them.
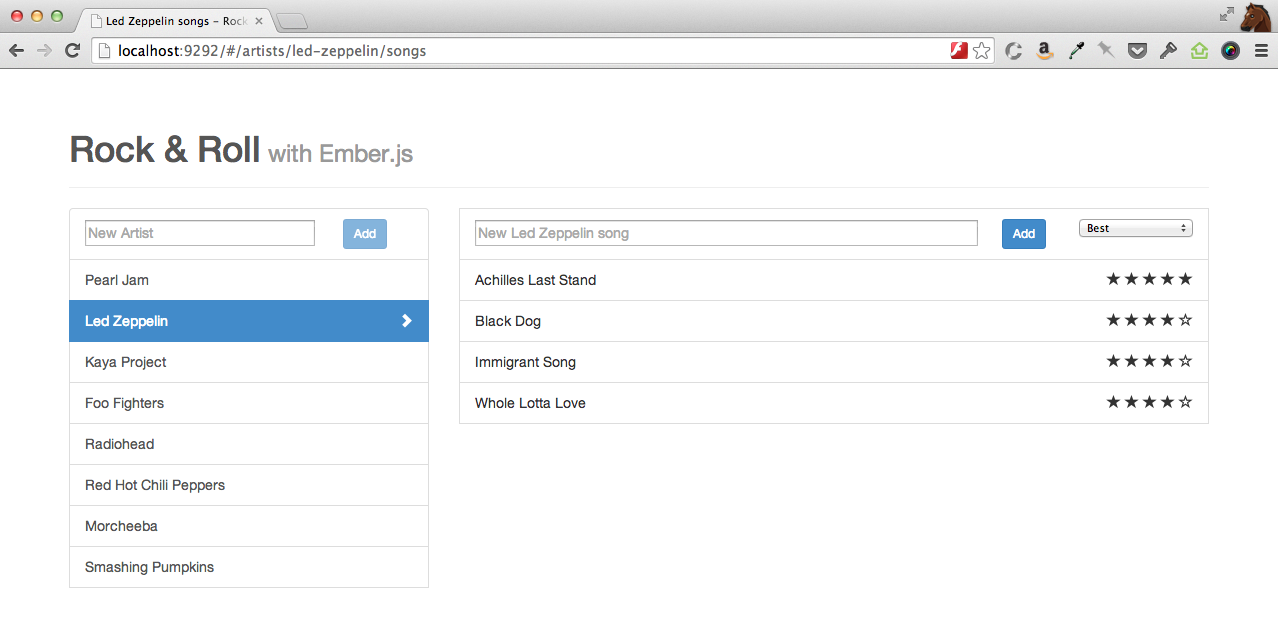
To use my favorite example app, Rock & Roll, I expect the page that
displays songs from a certain artist to have a segment that is common across all
pages in the app and another segment that uniquely identifies that page. For
songs of Led Zeppelin, this could be Led Zeppelin songs - Rock & Roll with
Ember.js.
I choose to put the unique part first so it can be clearly seen in a tab even if
its width is limited.
Finding the best place for setting the title
When considering where to implement setting the title, we have to keep in mind
that the code has to run at each route transition so that the title for the new
page is correctly set. Also, the context of the page (in the above example, the
artist Led Zeppelin) already has to be known.
Considering these constraints, the title could be set either in the
afterModel or in the setupController hook. The controller instance is not
needed for setting the title so I’ll go with the afterModel hook.
For the artists route, we content ourselves with setting a static title and we
can thus focus on the artist.songs route:
1234567
App.ArtistSongsRoute=Ember.Route.extend({(...)afterModel:function(model){varartistName=this.modelFor('artist').get('name');$(document).attr('title',artistName+' songs - Rock & Roll');}});
If we now navigate to the songs page for any artist, we can see the name of the
artist reflected in the tab title:
NOTE: Jonathan Evans has a great post in which he uses the didTransition
action in routes to set the document title. I recommend you to read it.
The most common way to define computed properties (CPs) in Ember.js apps is to
call the property function extension, passing in the “dependent keys”,
the path patterns that should trigger the recomputation of the property’s value.
person.get('fullName') will change if and only if either firstName or lastName
has changed. Its value gets cached between changes.
This simple, yet extremely powerful, construct is a fundemental piece of what
makes Ember apps a joy to work with and capable of scaling out to build complex
apps.
Let’s now define a slightly more difficult computed property:
Assuming that this.get('sortedPosts') contains the sorted posts latestPosts
is going to contain the first ten of these.
This is a very common pattern. We only want to show the 10 most recent posts,
the three top scorers on a Hall of Fame board or the 10 latest notifications of
a user. The above CP definition gets the job done. I see two ways it can be improved,
though.
First, it is prone to errors that are hard to debug. If you misspell
sortedPosts in the property(…) call, you can spend a considerable amount of
time trying to find out why your property does not update correctly.
Second, if it is used in several places of the application, it is a good idea
to extract the common pattern and reuse it to cut down on development time and
make the code more robust.
Eliminating the duplication
We need a repeatable way to create such computed properties that also eliminates
the risk of misspelling the property name:
This is exactly what we had before for latestPosts. Note the .[] in the
property path composition tucked after dependentKey. It guarantees that if any
of the elements in the array designated by dependentKey changes (elements are
added or removed), the property defined by sliced is going to be updated.
Then, whereever the need to slice up a certain array arises, we can use this
method to create it thusly:
A handful of computed property macros are built into Ember, while
the ember-cpm library defines some more, so check these first if you
recurringly find yourself in need of a certain logic in computed properties.
If you still haven’t found what you’re looking for, this post hopefully sets you
on your way to define your own ones.
In this post, I’ll expand on this latter. I’ll point at where these dependencies are
set up which gives me the possibility to introduce the options of the
basic parts, register and inject.
I’ll also share a couple of tricks to prevent using the abominable
this.__container__ and finish by showing how these pieces fit together in the
main method of the container, container.lookup.
How does Ember do it?
When an Ember app is created, the first thing it does is creating a container it
uses internally:
(Note: Here is where App.__container__ gets set and thus you, as an application
developer has access to the underlying container. Notice the double underscores,
though. It tells you that you should not ever use that in “real” apps. There are
officially supported ways, public API methods to achieve whatever you strive to
achieve the forbidden way. It is sometimes enough to ask on Twitter.)
Let’s see how the container is built up (as usual, I cut out the parts that are
not relevant to the current subject):
The faithful reader knows from the first part in the DI series that the
above makes it so that e.g this.namespace points to the application in all controllers
or that this.router refers to the router in all routes.
Let’s now turn out attention to the first definition block to learn new things.
optionsForType
optionsForType is a comfortable way to define options that should be used when
looking up any instance of a particular type from the container.
It can be seen above that components and views are defined as non-singletons
which mean that any time a component or view is looked up on the container, a
new instance is created and returned.
If you then write a template for the index route that just displays the equal
property you’ll see that its value is false, thus a new object is in fact
instantiated each time.
If you replace { singleton: false } with { singleton: true } the equal
property is going to be true, the model object is going to be a true singleton.
Singletons are the default
As Ember core team meber Stefan Penner points out, the { singleton: true
} option is the default, so there is no need to explicitly state it.
As a consequence, container.register('store:main', Store, { singleton: true })
is exactly the same as application.register('store', Store).
Objects that come from the container can access it
I learned this from Matthew Beale, a prolific Ember contributor and presenter.
It’s well worth your time to watch his presentation on “Containers and
Dependency Injection” he gave at an Ember NYC meetup.
Amongst other useful stuff, he also reveals that all objects that come from the
container have access to it via a container property on them.
That allowed me to write this.container.lookup in the route above since routes
are created by the container, too.
This also does away with the need to use the private __container__ in most
cases.
To instantiate or not to instantiate
Above, in the code for buildContainer you can see another option,
instantiate, which is false for templates and helpers. To save you from
scrolling all the way up, here are the relevant lines:
This option permits the registration of entities (yeah, stuff) that do not need
to be instantiated (or cannot be). Templates and helpers fit the bill since
they are functions and thus cannot be instantiated.
container.lookup
The lookup method in the container is a great summary for all the things discussed here.
First, if a singleton is needed and the object has already been looked up, we
just return the object saved in the cache. (see 1 above)
Next, we instantiate an object for the fullName (e.g ‘controller:artists’ or
‘route:index’). The instantiate method takes care of just returning the value if
the instantiate option is set to false. (see 2 above)
If the instantiation was successful (the factory was found) and a singletion was
demanded, we set this value in the cache so that we can return it the next time
it is looked up. (see 3 above)
Finally, we return what was looked up. (see 4 above)
container.lookup just calls the above function after verifying the fullName
has the right syntax, that is it has a type and a name part joined together by
a :.