In Part 1 of this series, we saw what symmetric relationships are, how to
model them on the back-end (using Rails) and how to implement a simple app that
displays such relationships in Ember.js, adhering to the JSON API specification
for serializing data.
The solution we came up with worked but was a very naive one. For N relationships
a resource had, it made 2N+1 queries to the back-end to display them. We should
do better and in this post we’ll see how.
(If you haven’t read the previous post, this one will not make much sense,
so I recommend to at least skim it before you delve into this one.)
One request to rule them all
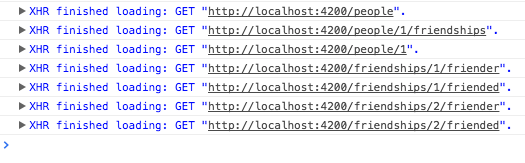
We’d observed that for each person whose friendships we wanted to observe, our
application made 2N+1 requests. One to grab the friendships themselves, and then
two requests for each friendship in that collection, one to fetch the
friender, one to fetch the friended person.
We also noticed that those people (instances of the Person model) had already
been fetched at that point so the extra requests were for nothing. Our mission
is thus to reduce the 2N+1 requests to a single one, the one that fetches the
friendships.
How would Ember (Data) know?
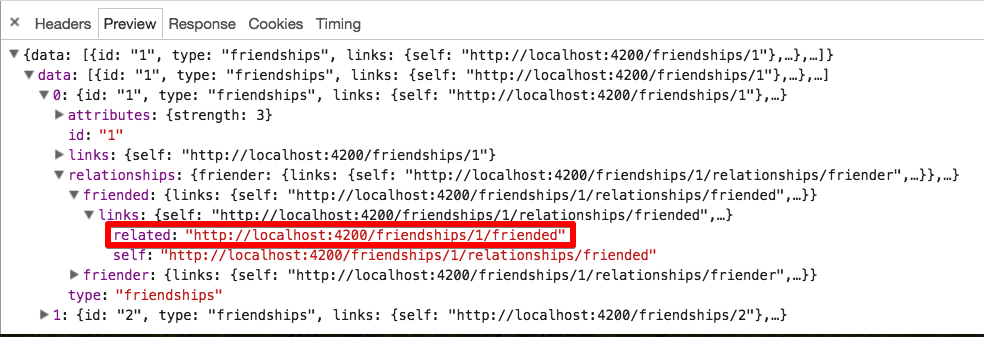
If we take a look at the data returned by the request for friendships, you can
see that both the friended and friender end of each are just links with no
type or identity information (like /friendships/1/friended). This is all
that’s needed for an asynchronous relationship, since the client (Ember Data, in
this case) can just fetch the relationship data when/if it needs it.
The solution, then, might be to include some data about the resource that the
relationship refers to. In the JSON API vocabulary this is called resource
linkage:
Resource linkage in a compound document allows a client to link together all
of the included resource objects without having to GET any URLs via links.
Digging around in the jsonapi-resources source, we find a relationship
option called always_include_linkage_data that seems to do what we need. Let’s
add that to the relationships of the friendship resource and see:
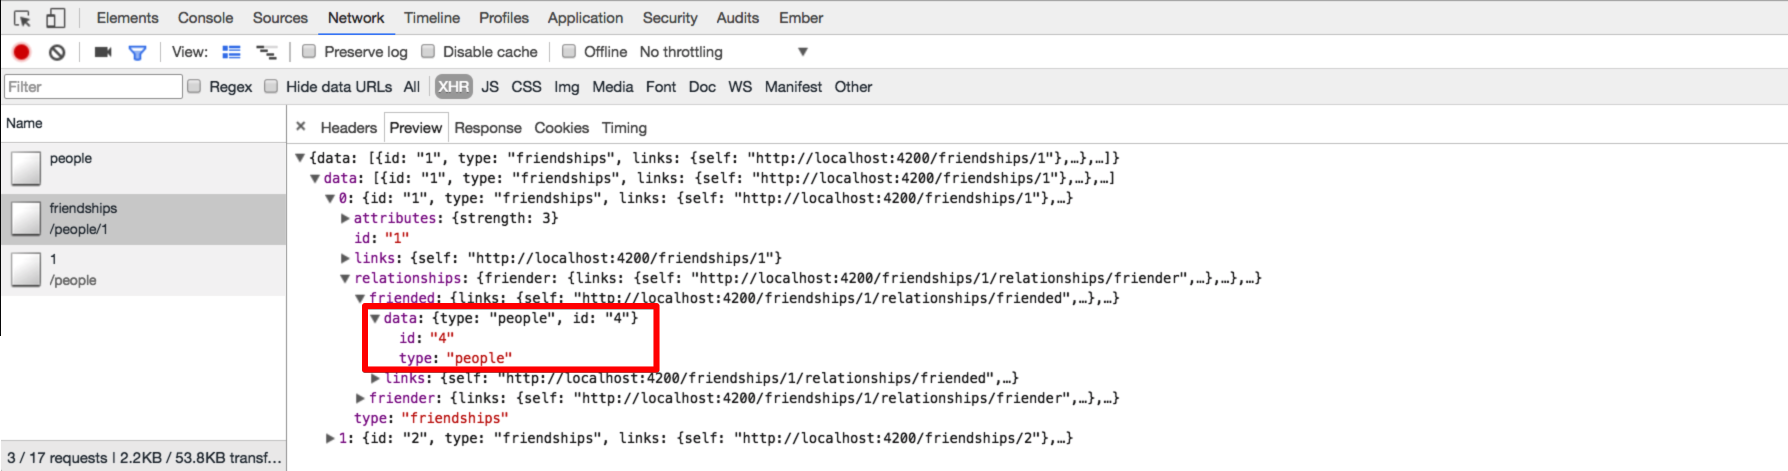
If we now reload our Ember app, we see how a data key was added to each
relationship in the response, uniquely identifying the person resource that is
the friender (or friended) in the friendship relationship:
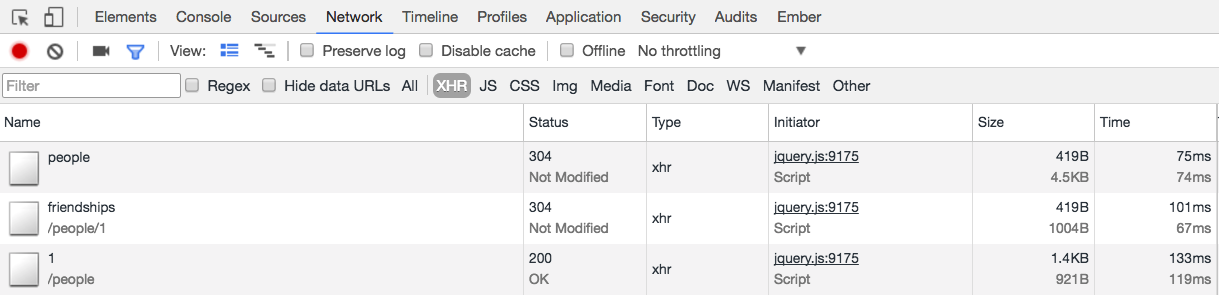
Furthermore, the extra XHRs we wanted to eliminate are now indeed gone as Ember
Data is smart enough to just use the referred resources that are already in the
store:
Let’s just be friends (not friendeds or frienders)
We have now achieved what we’d wanted and only have to make one request per
person to fetch and display their friendships.
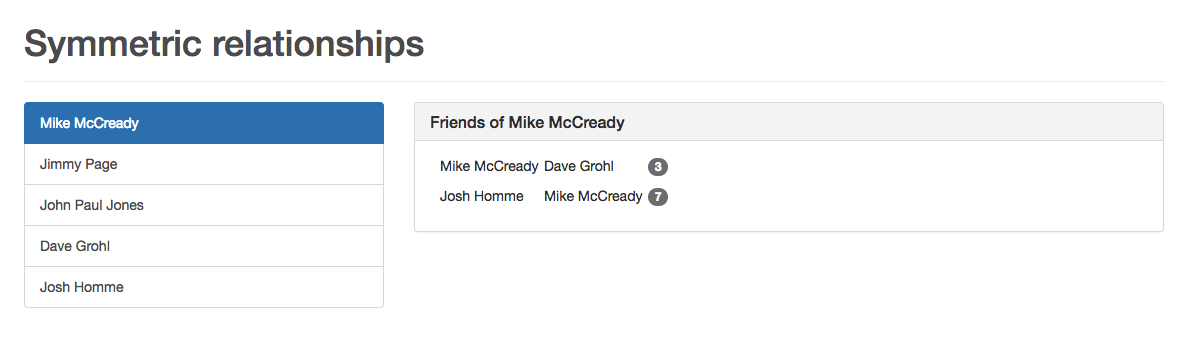
It looks a bit weird, though, that when a person’s friendships are displayed, we
also display the person’s name, too:
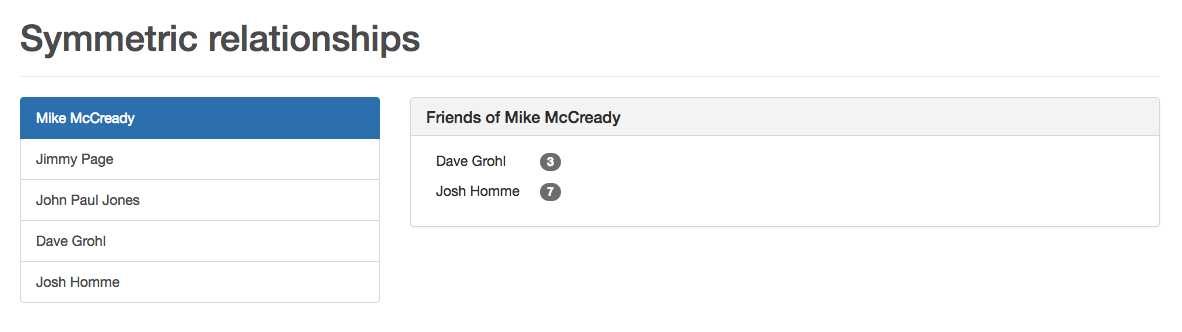
Let’s fix that by transforming the friendships of the person to an array where
each item only contains the friend’s name (and the strength of the friendship):
It works, we indeed only see the friend’s name, not the person’s:
Resources
Hopefully you can now implement a symmetric relationship with relative
ease, the next time you encounter it.
I made the source code of both the Ember app and the Rails API
available on Github. If you want to learn more about the jsonapi-resources gem,
I suggest you visit the documentation site.
Finally, if you’d like to receive the series as a pdf, fill out the form below
and I’ll send it to you right away!
In data modelling, a symmetric relationship is a special kind of relationship
where the description of the relationship from the perspective of one end of
the relationship is identical to looking at it from the perspective of the other
end.
Friendship between people is a good example. If Megan is Selma’s friend, it
follows that Selma is Megan’s friend, too. On the other hand, the “knows”
relationship between two people is not a symmetric one. I might know Danny
Carey (the drummer of Tool), but that does not imply he knows me.
Historical background
My research into how to model and implement such a relationship in an Ember
application was sparked by this Stack Overflow question that was posed by
a reader of my book. It was more difficult than I thought it would be so I
was intrigued to find the (an) answer.
My solution turned out to have a fairly large API component, too, so the
following post will show both the server-side implementation (in Rails) and the
client-side one (in Ember).
If you don’t speak Rails, fear not. The code is straightforward and easy to
understand without any substantial Rails knowledge, thanks in most part to the gem that
makes it extremely easy to serialize data models and relationships to json:api
format, jsonapi-resources.
Data modelling
We’ll start with the data modelling part, which is the Rails side.
To be able to model our problem in the data layer, let’s say that Friendships
have a friender and a friended end of the relationship and a strength
attribute that measures how strong their friendship is.
We should create a (data) migration that will create a database table when run:
$ rails g migration create_friendships
Let’s fill in the generated migration with the above attributes:
We’ll want to list all the friendships a person has so a friendships method
needs to be added to the Person class:
123456
# app/models/person.rbclassPerson<ActiveRecord::BasedeffriendshipsFriendship.where("friender_id = ? OR friended_id = ?",id,id);endend
We select the friendships where either the friender or the friended is the
person we query it for. This is where the symmetric aspect of the relationship
is implemented. We don’t care if the person friended somebody or if that
somebody friended him, they are friends.
Note that modelling it this way, we could split up the symmetric relationship
into the two constituent parts. We could return only the friendships where the
person in question “initiated” it (was the friender), or “let himself be
friended” (was the friender).
Server endpoints, resources, serializing relationships
We could now turn our attention to setting up the endpoints and serializing the
model, and relationship data for the client application to consume. First, let’s
install the jsonapi-resources gem:
$ gem install jsonapi-resources
This gives us a jsonapi:resource generator that we can use to create both the
endpoints and the serializer for our resources.
    $ rails generate jsonapi:resource person
    $ rails generate jsonapi:resource friendship
The created resources are placed in the app/resources folder. Let’s add the
attributes we want to serialize for each one:
The gem also provides a controller generator so let’s use it to create controllers for our resources:
    $ rails generate jsonapi:controller person
    $ rails generate jsonapi:controller friendship
They can be left empty but they need to be created in a way that they are
descendants of JSONAPI::ResourceController (the generator takes care of that):
This is rather standard Ember Data stuff, possibly with the exception of the
inverse definitions. Since we have two relationships between Person and
Friendship we need to specify the other end of each relationship and that’s
what we do with the inverse option.
With the models and routes in place, we can now see what the templates should look like.
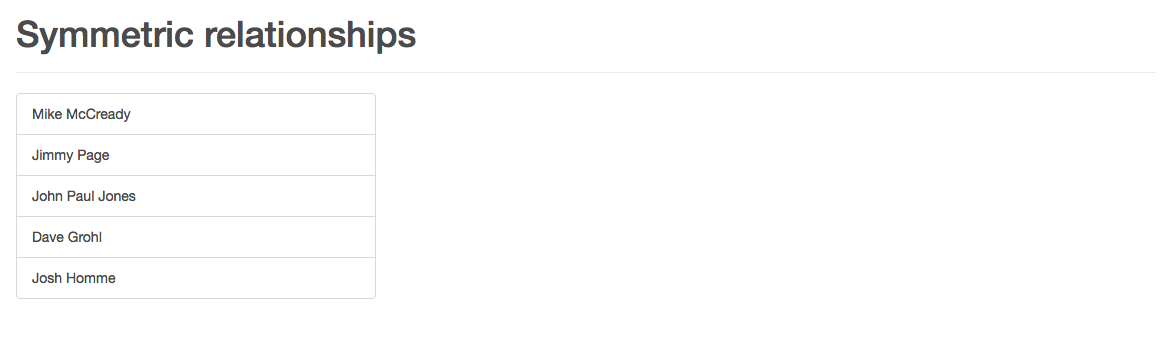
The top-level people route is again fairly straightforward:
The each loop iterates through each person and renders a link for each of
those that will take us to the person details page, which will display the
person’s friendships.
There is nothing fancy going on here, either. The model is the person
retrieved in the route. For each friendship that he has, the friender’s and
the friended’s name are rendered along with the strength of the relationship.
(Either friender or friended will be the person itself, but we can ignore that
in the first version.)
This naive approach works, the friendships for the selected person are listed correctly:
A 2N+1 problem
However, looking at the requests to the backend for just one page, one gets the
impression that we’re not done yet:
For each friendship the person has, two requests are sent to the backend. One to
fetch the friender and another one to fetch the friended person. This is not
an N+1 query problem, this is worse, a 2N+1 query problem!
On top of that, those requests are sent for no good reason as we’d previously
loaded the people referred by those friended and friended relationships.
In the next part, we’ll see how these wasteful requests can be eliminated and
we’ll also make the person details page less perplexing by not displaying the
person whose page we’re looking at in the relationships. Stay tuned!
FastBoot is the awesome add-on that adds
server-side rendering to your Ember app. This will make users of your
application see the content of your page before any of the javascript is
downloaded. In other words, the “time to first tweet”
of your app is greatly reduced, which is a big win where and when people have slow
or unstable network connections.
Another advantage is that search engine crawlers will have an easier job
indexing your site, which brings SEO benefits.
Furthermore, your site will be readable with Javascript disabled which is
convenient for screen readers.
I recently went through the process of enabling the demo version of the
Rock and Roll application to run in Fastboot.
Below, I’m going to tell you about the challenges I encountered and how I
overcame them in the hope that my journey will prove valuable when you do the same for
your app.
Installing the add-on
FastBoot is a regular Ember add-on, so installing it is piece of cake:
$ ember install ember-cli-fastboot
I could then run
$ ember fastboot
from the project’s directory and had the node server serving my application at
port 3000. It’s important to note that you should refresh your browser tab each
time you make changes to your code as FastBoot doesn’t (yet) auto-refresh the
way ember server does.
I then disabled JavaScript in my browser and then directed my browser to http://localhost:3000.
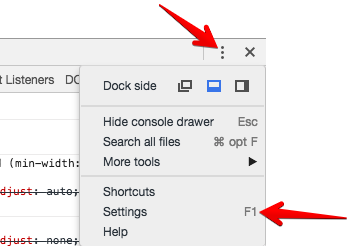
Disabling JavaScript in Chrome is most easily done by expanding the context menu
of Developer Tools and then clicking on Settings:
Mirage is disabled in FastBoot mode
My first obstacle turned out to be Mirage.
Mirage is a great tool for mocking server responses and even prototyping your Ember app.
I used it in development, too, and it turned out that since it turns itself off
when your app is running in FastBoot mode, the requests hitherto handled by
Mirage now went out and were thus unhandled.
The fix here was to disable Mirage in development (and, in my case, production,
too) and to make the requests against an actual API.
You also have to add the hosts that will serve your Ember app in FastBoot mode
to a list called hostWhitelist in your app’s configuration.
In my case, it contains the host I wanted to deploy it to and any localhost
port:
When I restarted the ember fastboot and looked at the server-rendered version
of my app, I saw that the dynamic data was now correctly rendered on the page.
However, it did not have any styling.
A quick glance at the documentation made me realize I needed to pass the
serve-assets option to the command so that it serves the css (and other asset)
files:
$ ember fastboot --serve-assets
document is not defined
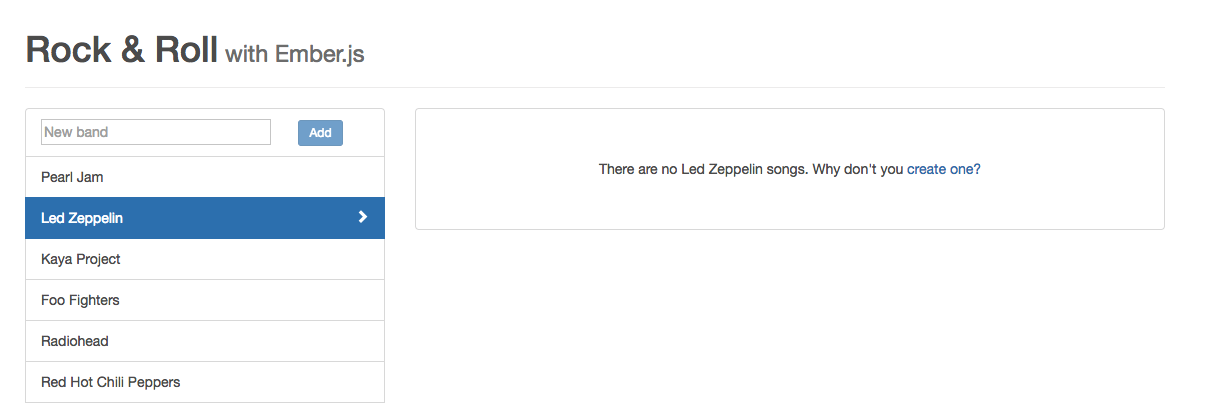
So now the main page, with the list of bands rendered fine but when I selected
one of the bands to have their songs displayed, I got the following error:
Error while processing route: bands.band.songs document is not defined
Since Fastboot runs your Ember app in a node environment, not in the browser,
document is not present. In my case, I accessed document (through jQuery)
to set the document title, which does not work in FastBoot mode.
The user guide suggested to use ember-cli-document-title, a FastBoot
compatible way to set document titles. So my next step was to install that
add-on:
$ ember install ember-cli-document-title
Armed with this great add-on, I only had to define a title (method) in the
corresponding route:
The next thing that did not work was that the songs for a specific band did not
load in FastBoot mode, the list of songs was empty each time.
Adolfo Builes and Jonathan Jackson helped me out by pointing out that songs are
loaded asynchronously. The request to fetch the songs was only fired when the
template rendered each song belonging to the band. FastBoot does not
know when the page is fully rendered and thus relies on the beforeModel,
model and afterModel route hooks having finished their work. When that
happened, the songs were not yet fetched and rendered on the screen yet:
The way to fix this was to block rendering in the afterModel hook, by
returning a promise that fetched the songs:
As you can see, I only pre-fetch the songs in FastBoot mode. In the browser, I
let rendering start earlier, with a “pop-in” effect (which can be remedied in
several ways in the browser, too).
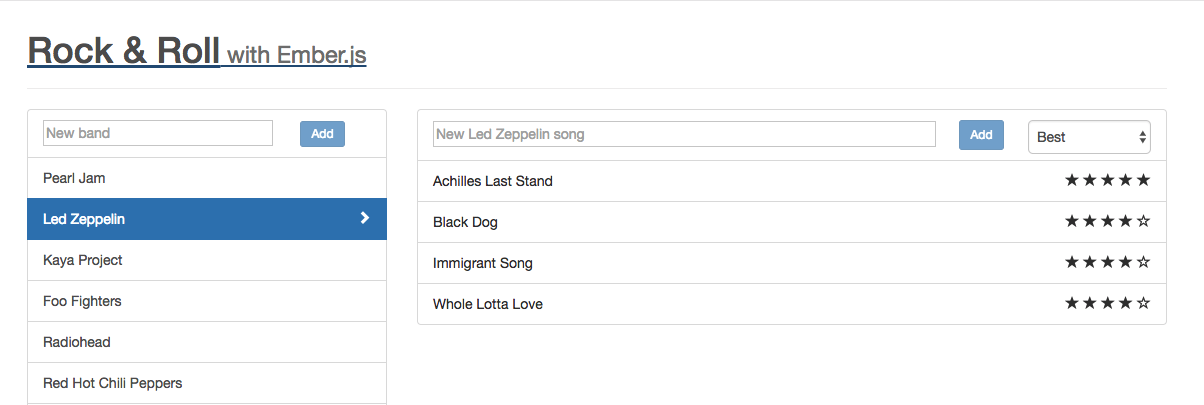
The songs now appeared in the FastBoot “view” of the app, too:
You can read more about this in the “Use Model Hooks to Defer Rendering” section
of the guide.
Fastboot-enabled hosting
It’s fine to have FastBoot working in development but nobody actually needs
it to work in that environment. It has to work when deployed to a server.
The guide has a whole page on deployment, listing several deployment
options, from which I chose Heroku as it seemed the easiest option. And it really was.
All I had to do was to set the buildpack URL from my project:
$ heroku buildpacks:set https://codon-buildpacks.s3.amazonaws.com/buildpacks/heroku/emberjs.tgz -a rarwe-demo
I then added a static.json file to the root of my project, to disable forcing
https requests, as the domain is not (yet) SSL-supported:
My app does not use many of Fastboot’s features. If you’re looking to see a more
complex use case, check out the Ember Weekend source code.
If you want to learn more about FastBoot’s architecture and rationale, I
recommend checking out Tom Dale’s great presentation he gave at Global
Ember Meetup.
I recently watched Mike Fotinakis’s presentation at the San Francisco Ember
meetup, Continuous Visual Integration with Ember,
and I’ve become really enthusiastic about visual diffs, and Percy.
It’s really worth the time and I highly recommend to watch it. I could say
“watch it now and then come back” but it’s a 50-minute long video while this
post takes 5 minutes to read, so I recommend to do it the other way around: read
this post first and then go and watch the presentation where he goes into more
details on what visual diffs and CI are, how Percy works and answers to
questions from the audience.
Ready? Cool. Start the timer and let’s go.
So what is continuous visual integration?
I will give you the high-level definition and rationale of visual diffs
and continuous visual integration as the post otherwise wouldn’t make sense.
When we change code, the intangible stuff apps are made of, we risk breaking it.
To prevent this, we write tests that guard against regression (a nice way of
saying breaking stuff) and do code reviews where someone goes over the code
diffs, and potentially after a series of edits, confirms it.
However, that’s just the code part. There are other ways to break a web
application, a major one among them is for the app to look differently than
before, in an unintended way. The background color of a button might change, a
link could have become hidden, or a css file could no longer be downloaded
which all lead to a degraded visual experience for visitors of the app.
Our (textual) tests could pass with flying colors and yet the users of the app
could be running away screaming from our site. Visual diffs guard against that
scenario by showing a visual diff, what certain scenarios looked before and
after the code changes under test.
Visual diffs as part of the review process
The idea is to have screenshots made at certain points in our user flows and
have a review process that approves the changes, just as we do for code.
To automate the process, we integrate the generation of visual diffing in the
automated testing process. This will produce the “before” and “after”
screenshots that will be used to generate the diffs. Let’s see how this is done
in practice.
Making all this a breeze with Percy
Percy is a visual diffing tool that automates all of this and integrates
smoothly into the Github pull request process. To get started with Percy,
install the Ember addon:
$ ember install ember-percy
If you use Mirage for your tests, like I do, make sure to define a passthrough
rule for Percy on top of your Mirage config, before any other rules (see
the docs):
Before implementing the change, I wrote a test that verifies if the songs for a
particular band are listed correctly:
12345678910111213141516
// tests/acceptance/songs-test.jsimportEmberfrom'ember';import{test}from'qunit';(...)test('List songs for a band',function(assert){visit('/bands');click('a:contains("Tool")');percySnapshot('list-songs-for-band');andThen(function(){assert.equal(Ember.$('.song').length,3,"All songs for the selected band are displayed");assert.equal(Ember.$('.song:contains("46 & 2")').length,1,"The first song is displayed");});});
The thing to note here is percySnapshot. If Percy is set up in the environment
where the test runs, it generates a screenshot identified by the name we pass it
(or auto-generates one). To set up Percy, the PERCY_TOKEN and PERCY_PROJECT
env vars need to be set in the CI tool of your choice. The Percy
docs explain how.
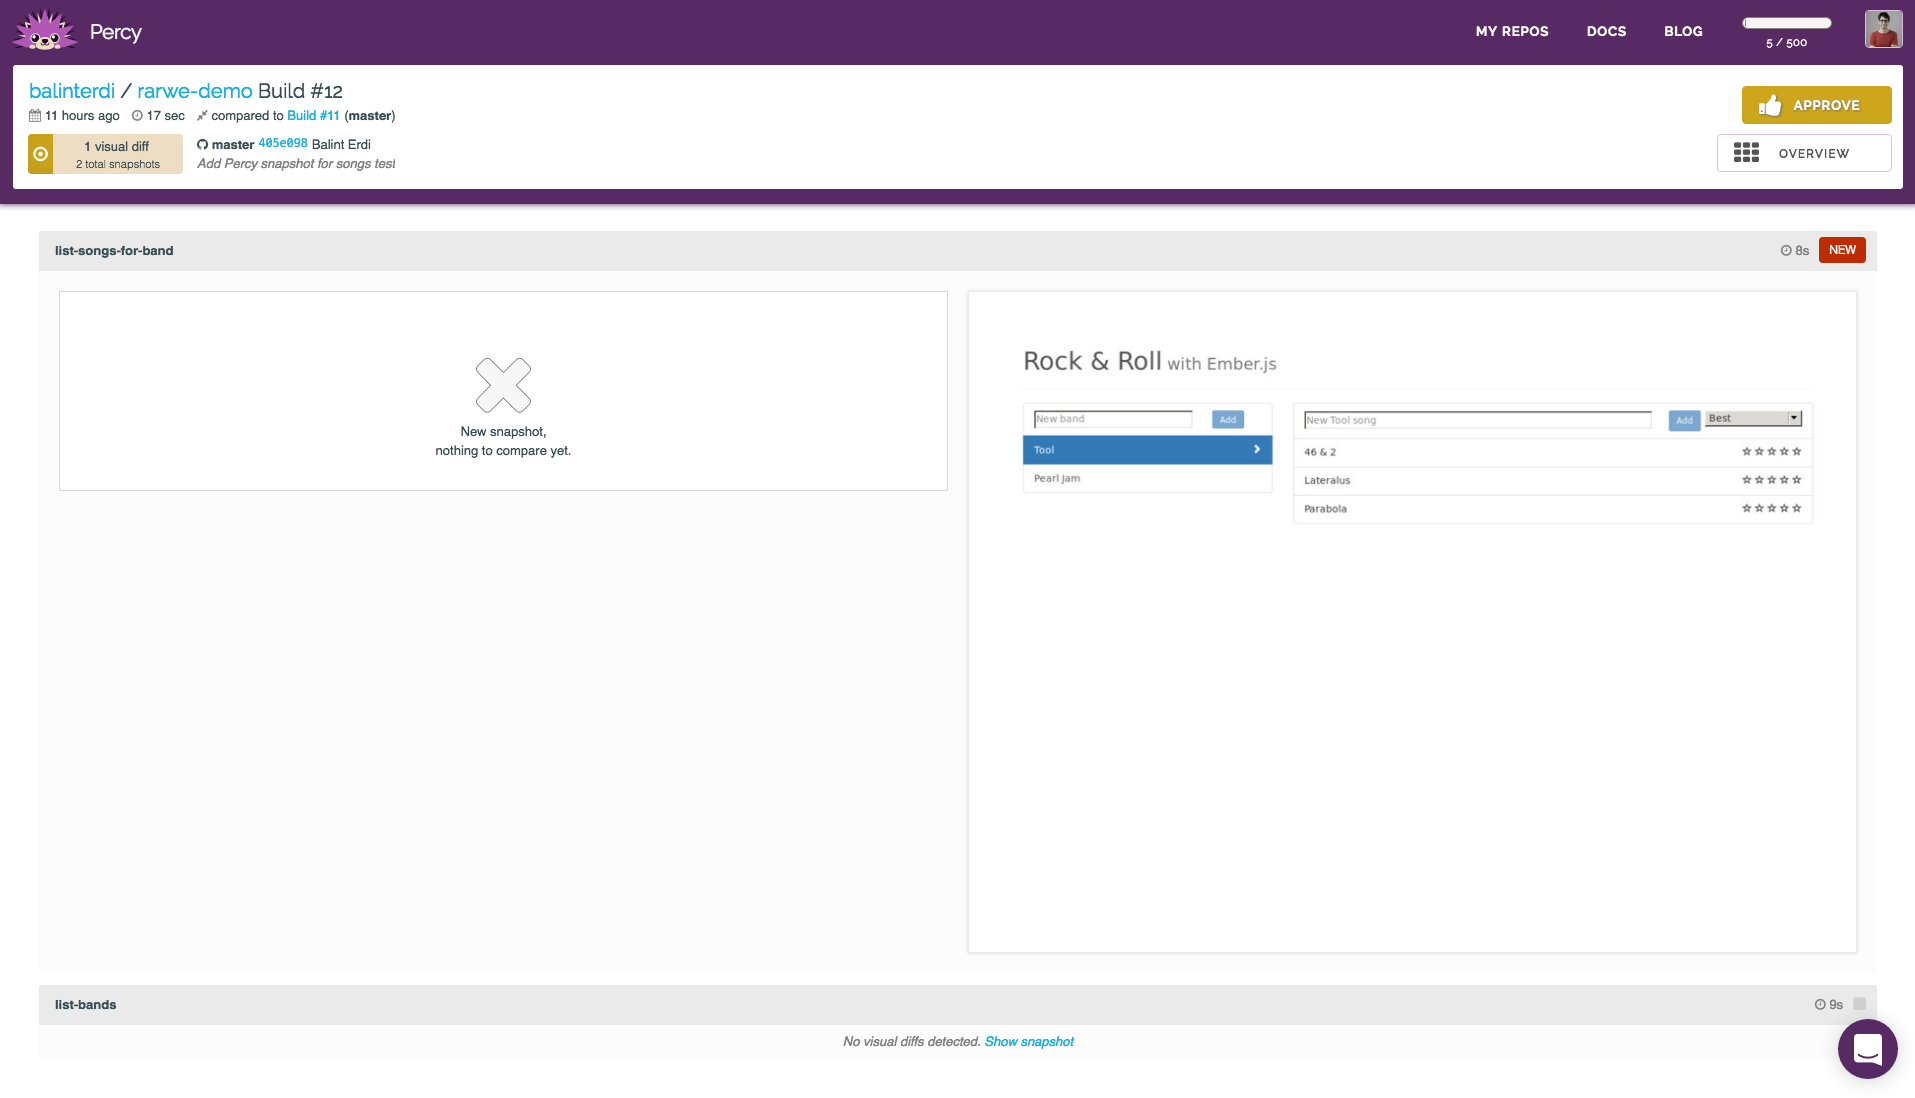
Once we have a percySnapshot, the next time we push and our CI builds the
project, Percy will have a new snapshot for us:
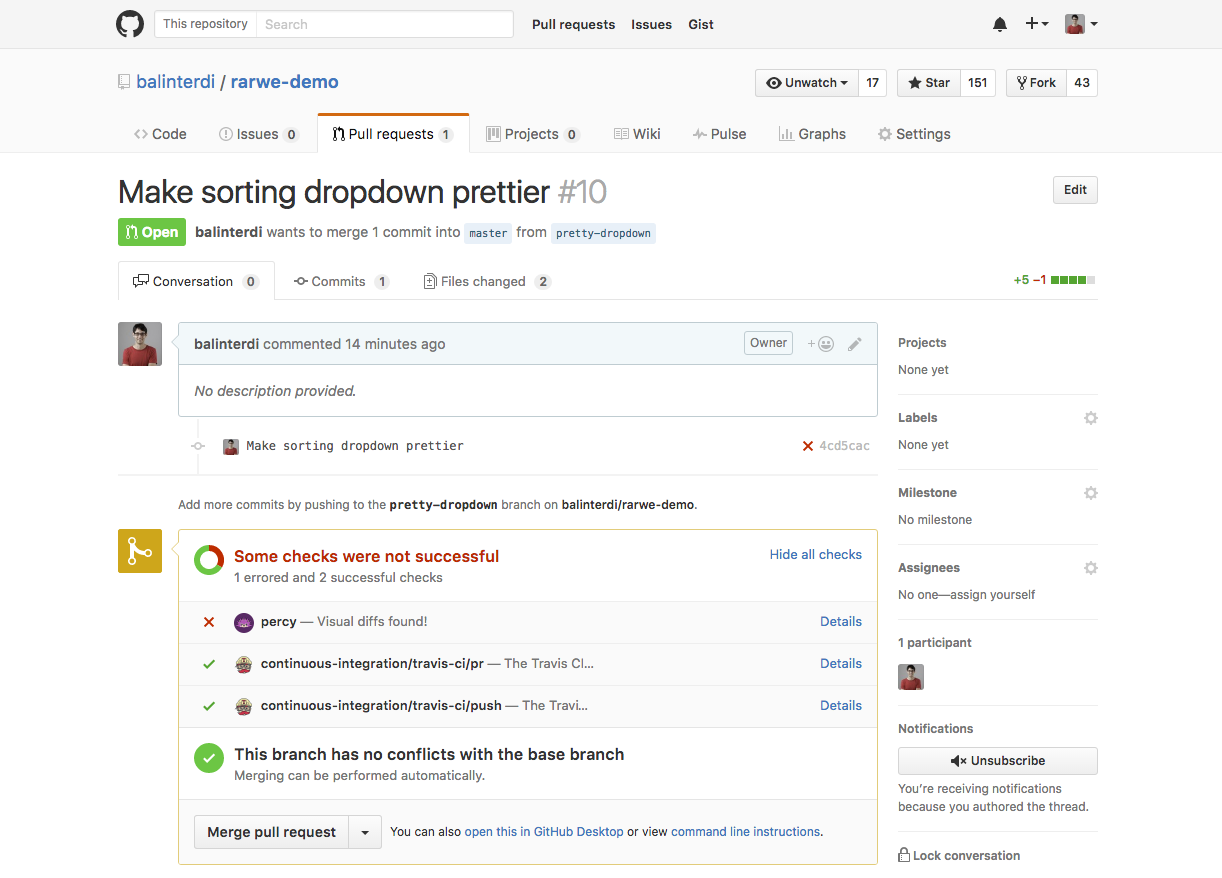
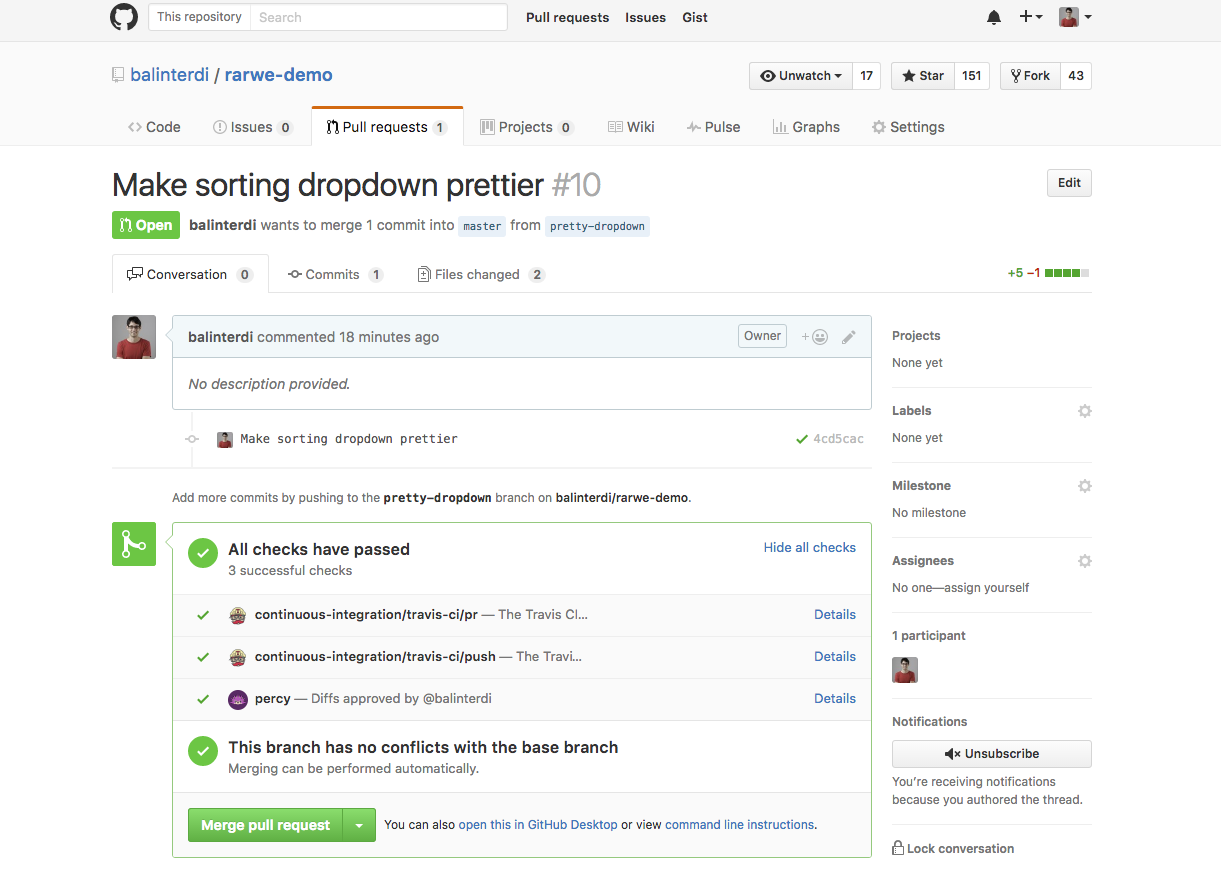
We can now implement our feature on a branch and create a pull request for it on
Github. As you can see on the following screenshot, approving the visual diffs
is now part of the flow:
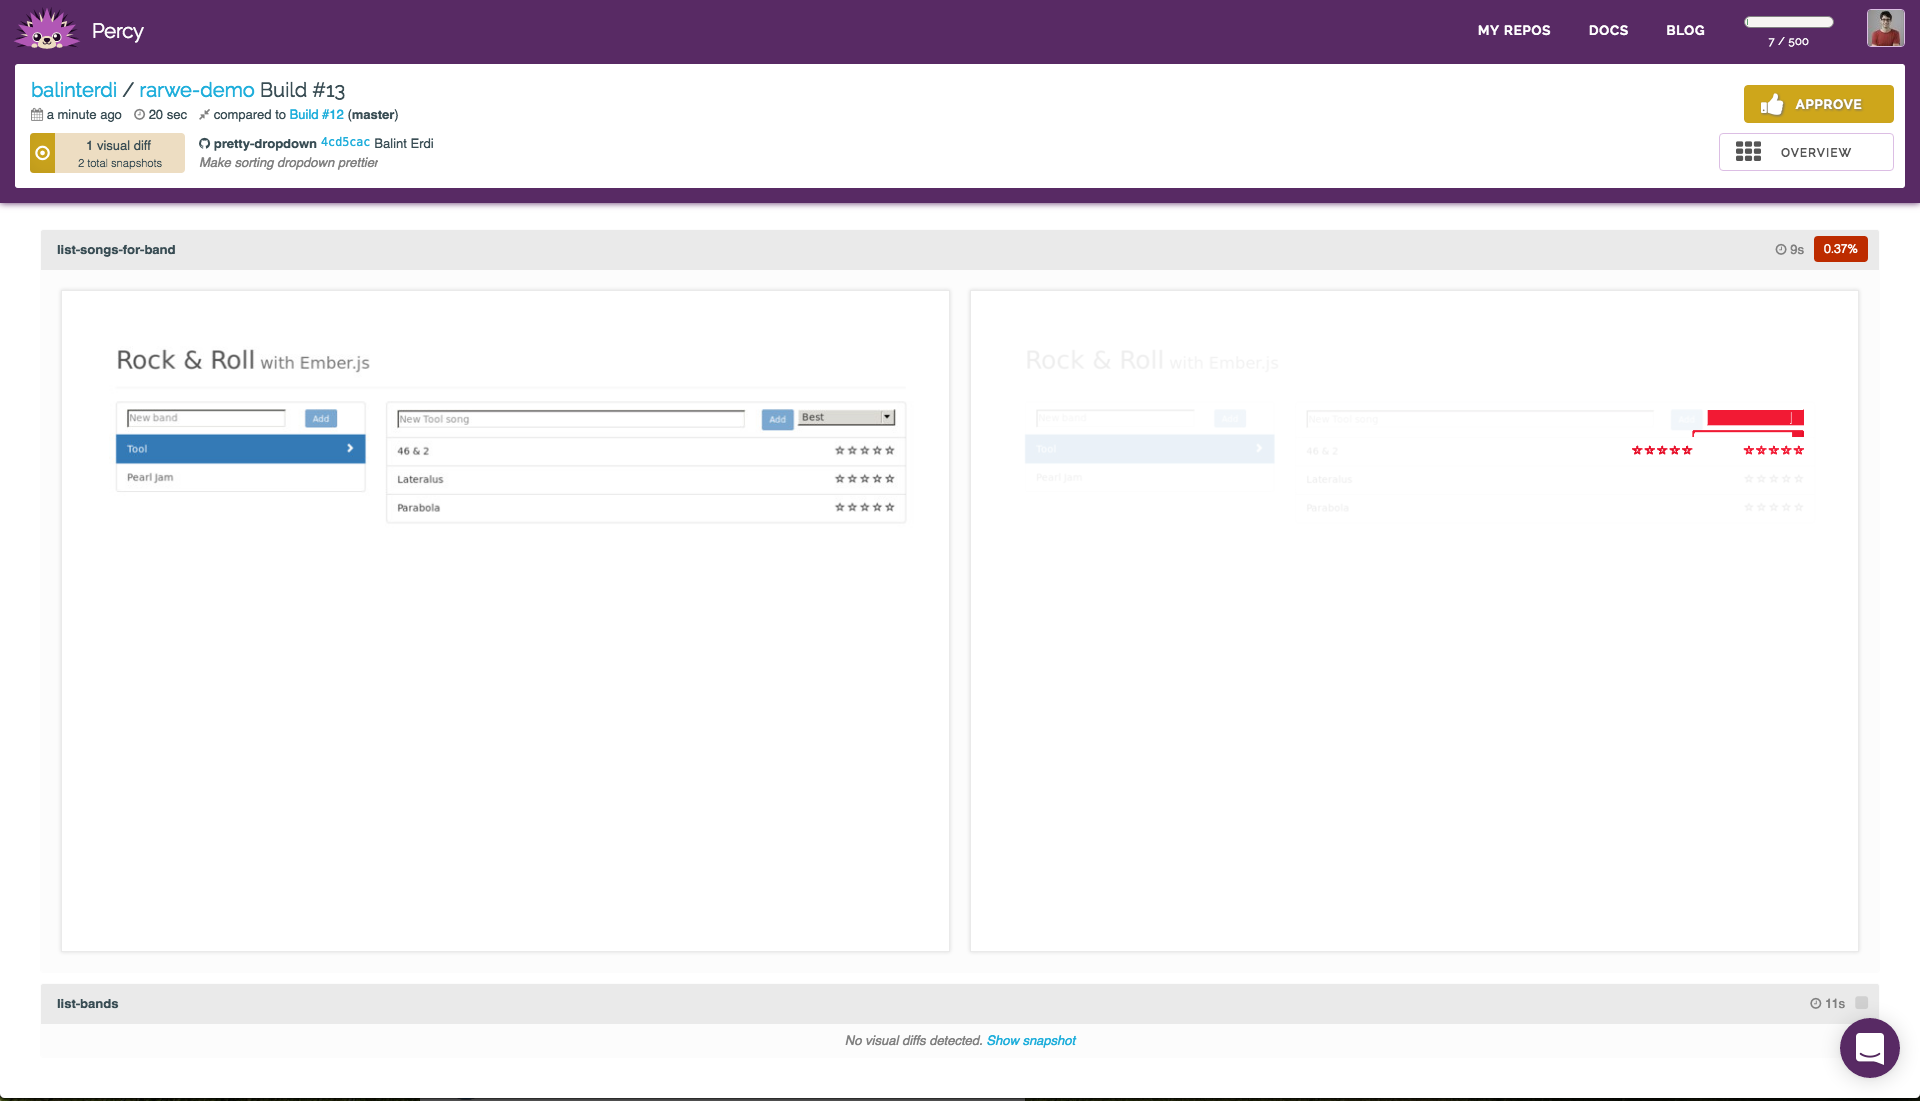
Clicking “Details” takes us to the visual diffs where we must explicilty approve
the changes:
Once the visual diffs are approved, the PR is all green and we can lean back in
our chairs and merge it, safe in the knowledge we did not visually break the
app.
Just as with “normal” tests, the more snapshots we have, the higher the chance
we did not introduce any regressions with our latest changes. Mike recommends a
“breadth first” approach, making screenshots from tests that verify different
scenarios instead of a “depth first” approach, creating several screenshots for
the same scenario.
Closing words
I’m all sold on visual diffing and I think there is tremendous value in securing
our apps this way.
I’m sure you have written a lot of code that looks something like this:
1234567891011121314151617
// app/controllers/band.jsactions:{save(){letband=this.get('model');this.set('isLoading',true);returnband.save().then((result)=>{this.set('successMessage','Band has been saved.');}).catch(()=>{this.set('error','Band is too unruly to be saved.');}).finally(()=>{this.set('isLoading',false);});}}
Setting back isLoading to false is conveniently placed in a finally handler
so that it happens both if the promise resolves successfully (the band is
saved) and if it is rejected (there is an error during the save).
The isLoading is then used in the corresponding template to show a spinner
and/or disable the save button while the save is in flight:
I know I have written this hundreds of times by now and it has increasingly
disturbed me that setting and unsetting the loading flag is boilerplate code,
something that could be refactored.
One nice thing about promises is that they are easy to compose. Here is how
we could define a function that adds the boilerplatey parts:
123456789101112131415161718192021
// app/controllers/band.jsfunctionsaveWithLoadingFlag(operation,loadingProperty){this.set(loadingProperty,true);returnoperation.finally(()=>{this.set(loadingProperty,false);});}actions:{save(){letband=this.get('model');returnsaveWithLoadingFlag.call(this,band.save(),'isLoading').then((result)=>{this.set('successMessage','Band has been saved.');}).catch(()=>{this.set('error','Band is too unruly to be saved.');});}}
You might go a tiny step further and use a default value for the loading flag:
123456789101112131415161718192021
// app/controllers/band.jsfunctionsaveWithLoadingFlag(operation,loadingProperty='isLoading'){this.set(loadingProperty,true);returnoperation.finally(()=>{this.set(loadingProperty,false);});}actions:{save(){letband=this.get('model');returnsaveWithLoadingFlag.call(this,band.save()).then((result)=>{this.set('successMessage','Band has been saved.');}).catch(()=>{this.set('error','Band is too unruly to be saved.');});}}
Since saveWithLoadingFlag returns a promise, we can add our own handlers to it,
including other finally handlers.
You can find a working example here,
where you can play around with it.
Yesterday I published an updated version of the Rock and Roll with Ember.js book.
The app now runs on 2.8 (Ember CLI, Ember and Ember Data) and, as usual, there are a few other changes.
The biggest of these was updating the Deployment chapter.
PageFront seems defunct so I replaced it with
Surge. Above that I also updated the section on deploying
(to S3) with ember-cli-deploy as things have changed quite a bit.
You can check out the full list of changes here
or the book itself here.
PSA: Ember 2.9 will bring the long-awaited new rendering engine, Glimmer 2!
I already went ahead and updated the app to 2.9.beta to give it a whirl.
The results were pretty jaw-dropping:
My app.js size after upgrading the Rock and Roll #Ember app to use Glimmer 2 (so from 2.8.1 to 2.9.0-beta.2) went from 233K to 79K 😮
Today marks the release of the Rock and Roll with Ember.js book,
version 2.7, which means the app built in the book now runs on Ember 2.7 (and uses Ember CLI 2.7).
There is a number of other small fixes, the full list of which you can see
here.
Testing is given much emphasis in the Ember.js community, and testing tools have
showed steady progress to reduce the cost of writing tests of all types.
Lauren Tan wrote a great post
about how Dependency Injection (DI) can be used to decouple a parent component
from the internals of its child components. One of the gains of doing so is that
the parent component becomes more focused and thus easier to test.
In this post, I’m doing something similar, although much simpler. I want to show
you how to use DI in a simple helper function to make it easier to test.
Just your ordinary, run-of-the-mill function
Although the helper is an Ember (template) helper, the concepts could be very
easily transferred to other frameworks, libraries and even languages.
I recently had to modify a normalizeText helper function that looked
like this:
(I realize the above code does not handle a text value of undefined or null.
The real code does but I want to keep the code examples to the minimum necessary
to get my point across.)
Comparing objects to objects
Its test was quite simple and straightforward:
12345678910
// tests/unit/helpers/normalize-text-test.jsimport{normalizeText}from'../../../helpers/normalize-text';import{module,test}from'qunit';module('Unit | Helper | normalize-text');test('it works',function(assert){letnormalizedText=normalizeText(["The brown fox\r\njumped over the quick rabbit.\n"]);assert.equal(normalizedText,"<p>The brown fox</p><p>jumped over the quick rabbit.</p>");});
The problem with that test is that we compare two Handlebars.SafeString
instances (returned by Ember.String.htmlSafe) which are different even if
the strings they wrap, their value, is the same:
We’re, however, interested in the equality of the strings. If only there was a
way to replace that pesky Ember.String.htmlSafe call from the call site…
DI to the rescue
This is exactly what Dependency Injection can help us do. Instead of hard-coding
that “sanitizer” function dependency, the function could take it as a parameter
so that callers could inject it. Usually DI examples use (and thus inject) class
names or object instances but it is important to realize that the injected param
could be very “primitive”, like a simple function.
Notice how easy ES2015 destructuring makes the assignment of the sanitizer
function:
1
let{sanitizer=Ember.String.htmlSafe}=params;
If no sanitizer key was present in params, then it will have a value of
Ember.String.htmlSafe, the default behavior.
The call from the test can now override the default behavior of sending the
normalized text through Ember.String.htmlSafe by passing in a “no-op”
sanitizer function:
1234567891011121314
// tests/unit/helpers/normalize-text-test.jsimport{normalizeText}from'../../../helpers/normalize-text';import{module,test}from'qunit';functionleaveAsIs(text){returntext;}module('Unit | Helper | normalize-text');test('it works',function(assert){letnormalizedText=normalizeText(["The brown fox\r\njumped over the quick rabbit.\n"],{sanitizer:leaveAsIs});assert.equal(normalizedText,"<p>The brown fox</p><p>jumped over the quick rabbit.</p>");});
We’re now comparing simple strings which place nicely with assert.equal (with
===), and our test now passes.
Non-testing benefits
Code modifications introduced for the sake of testing usually also improve the
non-testing aspect. Here, we made it possible to pass any function before we
return the normalized text. We could, for example, use this to replace the <p>
tags with <span>s, if we so wish.
With some delay, but I just sent an update to all of the Rock and Roll with
Ember.js customers. The book brings the app in sync with Ember, Ember Data and
Ember CLI 2.6. Among a few other improvments it:
Makes sure the new Ember welcome page is removed before generating the
application template: #196
Adds a version string to the book’s title and also in the Preface so that the
reader knows whether they are reading the latest version: #174
The list of all accomplished things can be seen here