I'm all about Ember.js recently

How Real-time Updates Work in Discourse

Given that I started engaging with web sites in the early 2000s there are still some things today that I constantly marvel at. One of these things is real-live update, the absolutely wonderful experience that I’m looking at a page and it displays a change due to an action of another user right in front of my eyes, without me hitting refresh.

Discourse, being a state-of-the-art forum software does this, too, and, provided my enthusiasm with all things that bring the web alive, I wanted to understand how that works. More specifically I wanted to understand how displaying new posts for the topic I am looking at can work its magic.

In the following post, I want to lead you through the whole process so that you see exactly how the pieces fit together. In fact, that may be the thing I enjoy most as a developer. Being able to take apart a complex application and gain the comprehension of how the individual pieces function and how they are orchestrated to make a complex system work.

Tools

Discourse is built on Ruby on Rails and Ember.js, two fantasic frameworks. Given my recent fascination with front-end development, and Ember.js in particular, I’ll focus on the front-end part here and only talk about the back-end mechanism as much as it is needed to see the whole picture.

Consequently, some knowledge about Ember.js is assumed. You can go through the Getting Started guide on the official Ember.js site or -if you prefer showing to telling- sign up to my mailing list to watch a series of screencasts to get a basic grip on Ember.js architecture as we go through the building of an application.

Message bus

Discourse uses a ruby gem (library) called message_bus that enables listeners to subscribe to any channel of their liking and get notified about events happening on that channel.

It also includes a javascript lib to allow connecting to the message bus from the client-side application. That’s what Discourse uses from the Ember.js app. Let’s see how.

Subscribing to new posts on a topic

When the user navigates to a topic page, the topic route gets activated and its hooks run. After resolving the model, the setupController which, as its name indicates, sets up the controller belonging to the model. It, among other things, calls the subscribe method on the controller, see below:

1
2
3
4
5
6
Discourse.TopicRoute = Discourse.Route.extend({
  setupController: function(controller, model) {
    (...)
    controller.subscribe();
    (...)
  }

The controller for the model is Discourse.TopicController, so next we will look into that:

1
2
3
4
5
6
7
8
9
10
11
12
13
14
15
16
17
18
Discourse.TopicController = Discourse.ObjectController.extend(..., {
  subscribe: function() {

    // Unsubscribe before subscribing again
    this.unsubscribe();

    var bus = Discourse.MessageBus;

    var topicController = this;
    bus.subscribe("/topic/" + (this.get('id')), function(data) {
      (...)

      // Add the new post into the stream
      topicController.get('postStream').triggerNewPostInStream(data.id);
    });
  },
  (...)
}

The controller subscribes to the channel /topic/<topic_id>. The client polls the message bus for potential new messages every 15 seconds. You can see the XHR calls in the console of your browser:

Polling the message bus

When something is published to that channel, the callback function gets called back with the data related to that event. The data, in that case, is going to be the new post record. When the callback is fired, we call the triggerNewPostInStream method on the postStream with the id of the post. What does triggerNewPostInStream do, then? We can check that in the PostStream model.

1
2
3
4
5
6
7
8
9
10
11
12
13
14
15
16
17
18
19
20
21
/**
  We use this class to keep on top of streaming and filtering posts within a topic.
**/
Discourse.PostStream = Em.Object.extend({
  (...)
  /**
    Finds and adds a post to the stream by id. Typically this would happen if we receive a message
    from the message bus indicating there's a new post. We'll only insert it if we currently
    have no filters.
  **/
  triggerNewPostInStream: function(postId) {
    (...)

    var loadedAllPosts = this.get('loadedAllPosts');

    if (this.get('stream').indexOf(postId) === -1) {
      this.get('stream').addObject(postId);
      if (loadedAllPosts) { this.appendMore(); }
    }
  },
}

The docstring is quite revealing. If the post id is already in the stream, we don’t do anything. If it is not, we add it to the stream (an Ember array). If the loading of posts has finished, we are ready to append the new posts to the stream.

Notice we are adding post ids, not actual post records so the next investigation step is to explore how ids get turned into records.

1
2
3
4
5
6
7
8
9
10
11
12
13
14
15
16
17
18
19
20
21
22
23
24
25
26
27
28
/**
  Appends the next window of posts to the stream. Call it when scrolling downwards.

  @method appendMore
  @returns {Ember.Deferred} a promise that's resolved when the posts have been added.
**/
appendMore: function() {
  var self = this;

  // Make sure we can append more posts
  if (!self.get('canAppendMore')) { return Ember.RSVP.resolve(); }

  var postIds = self.get('nextWindow');
  if (Ember.isEmpty(postIds)) { return Ember.RSVP.resolve(); }

  self.set('loadingBelow', true);

  var stopLoading = function() {
    self.set('loadingBelow', false);
  };

  return self.findPostsByIds(postIds).then(function(posts) {
    posts.forEach(function(p) {
      self.appendPost(p);
    });
    stopLoading();
  }, stopLoading);
},

The above appendMore method is responsible for retrieving the post ids that have to be added below the currently visible posts and turning these ids into actual post records.

We are getting close now, but let me speed things up a bit by only explaining the process but not showing all the code which makes it so that the new post objects are finally pushed to the posts array from where they will be finally displayed. (If you are such a code untangler as I am, and would like to see the code, it is right here)

What happens is that the new posts get displayed in windows, not one by one. This window is kept updated in the nextWindow property, from the stream we pushed post ids into. It is the slice in this stream that starts at the last loaded post id and has a maximum length of posts_per_page, a configuration setting. This construct also makes it possible, quite ingeniously, for this same code to load the next batch of posts to the page as the user scrolls down.

The window still contains ids and to fetch the related post records an identity map (yes, Discourse has its identity map implementation, too!) is used via the findPostsByIds method. Once the records are retrieved , they are each passed to the appendPost method that just pushes them to the posts array.

Displaying the new post in the topic stream

The only thing remains to be seen for the whole picture to be clear is how the stream of posts is displayed in the browser. The template that renders the topic, along with its posts, is the topic template.

The relevant part of the template is below:

{{#unless postStream.loadingFilter}}
  {{cloaked-collection cloakView="post" idProperty="post_number" defaultHeight="200" content=postStream.posts slackRatio=slackRatio}}
{{/unless}}

If the post stream is not loading, we render the posts through the cloaked collection. I will not go into details about what cloaked-collection does, (but I highly recommend a blog post on it by its author, @eviltrout), the important thing in the current discussion is that it renders the post template (cloakView=”post”) for each post from postStream.posts (content=postStream.posts).

That is where the two parts come together. Since a binding is established with the above handlebars line to the posts property of the postStream, every time new posts are added (see how in the first part of the walkthrough), the collection is going to be rerendered and consequently the posts appear in “real-time”. The magic of Ember.js bindings.

In parting

I skipped over a couple of things so that this post does not turn into a chapter of a novel, but I hope that my walkthrough could let you peek behind the curtains and see how such a miraculous feature is made possible.

The key takeaway is that building with the right tools (namely the message bus and the solid foundations of Ember.js), which a lot of people have put an enormous amount of time into, makes such a killer feature within your reach. Not easy, but definitely doable.

At Your Service: Publicly Available API for the Rock and Roll Ember.js App

So far, if you wanted to code along my developing an example Ember.js application, Rock & Roll, you had to run the server side component. That required ruby to be installed on your machine, and you had to clone the repository, and start the server each time you wanted to make some progress with the application.

I realized that might be cumbersome and thus I made the server publicly available at http://rock-and-roll-with-emberjs-api.herokuapp.com .

I have also updated the client-side component to connect to that remote api.. All backend requests now go through App.Adapter.ajax which basically just delegates to Ember.$.ajax prefixing urls with the backend host:

1
2
3
4
5
App.Adapter = {
  ajax: function(path, options) {
    return Ember.$.ajax('http://rock-and-roll-with-emberjs-api.herokuapp.com' + path, options)
  }
}

If you work with an earlier version of the client app, you might have to rewrite urls in multiple places but I figured it is still less work than running the server yourself.

I hope that facilitates your working along with the Rock & Roll app and makes your journey to Ember.js proficiency smoother. If you want to see the screencast series in which I develop said application, you can sign up to my mailing list and have each episode auto-delivered to your inbox.

Changing the URL Type of Your Ember.js App

By default, Ember.js uses the hashchange event in the browser to change URLs. This is the most widely supported way but it feels like a hack and there is a better way, introduced in HTML5: the History API.

Bear in mind that the History API has a lower browser support rate than the hashchange event does (~70% vs. 89%), so there is a tradeoff involved that you should decide to make or not to make.

Ember.js makes it really easy to change the URL type. All you have to do is add the following lines to your client app:

1
2
3
App.Router.reopen({
 location: 'history'
});

Seems too good to be true (that is just the way Ember is), but provided you did not assemble any routes manually and only used Ember’s tools to transition between routes (e.g link-to, transitionTo, etc.), that is all the client-side code changes you had to make.

The server side needs to be adjusted, too, though, since the server now gets sent the client-side routes, too. How to do this can vary depending on the application server you use.

In the case of the Rock & Roll app, here is what config.ru looks like:

1
2
3
4
5
6
7
8
9
10
11
12
13
14
15
16
run Proc.new { |env|
  # Extract the requested path from the request
  path = Rack::Utils.unescape(env['PATH_INFO'])
  if path.start_with?("/artists")
    path = '/'
  end
  index_file = @root + "#{path}/index.html"

  if File.exists?(index_file)
    # Return the index
    [200, {'Content-Type' => 'text/html'}, [File.read(index_file)]]
  else
    # Pass the request to the directory app
    Rack::Directory.new(@root).call(env)
  end
}

I only had to add the path.start_with? condition to make sure the server serves the Ember application on that route. It is not an ideal solution because anytime you add a top-level route to the Ember app, you would also have to modify the server config but this is the bare minimum that got the job done.

Hooray for clean URLs: History API
URLs

Build an Ember.js App With Firebase

Ember.js is an outstanding client-side framework for building single-page applications. To make your application truly come to life, Firebase, being a real-time backend, is a natural choice as the server-side component.

Sending data between the server and the client is a task all web applications have to address. However, if one uses the Firebase-Ember.js stack, this problem is largely abstracted away by these wonderful frameworks.

To make them work together, the Firebase team released their official Ember.js bindings, emberFire.

How does it work?

Before we look at the making of the actual application it is important to understand how the emberFire library works.

It is built on two primitives, EmberFire.Object and EmberFire.Array. These extend Ember.ObjectProxy and Ember.ArrayProxy, respectively. These proxy objects delegate any get and setProperty calls that are not defined on the proxy to an underlying content object.

What this means is that we can work with Firebase references in our application as if they were Ember objects. In the case of a single object, setting a property will cause a child with that name to be written with the passed value. When working with an array, the usual array methods (e.g pushObject) can be used and they will do the right thing in the underlying Firebase reference (e.g push the new node).

Setting up the environment

To set up the necessary dependencies, it is easiest to download the latest Ember starter kit and add the following script tags to the main template:

1
2
3
<script src="https://cdn.firebase.com/v0/firebase.js"></script>
<script src='https://cdn.firebase.com/v0/firebase-simple-login.js'></script>
<script src="http://firebase.github.io/emberFire/emberfire-latest.js"></script>

With that in place, we can start developing. For the sake of focusing on one single issue at a time, the code snippets in this post do not always exactly match those in the actual application. If you want to see them in their entirety, you can always check the source code on Github.

The Idealist

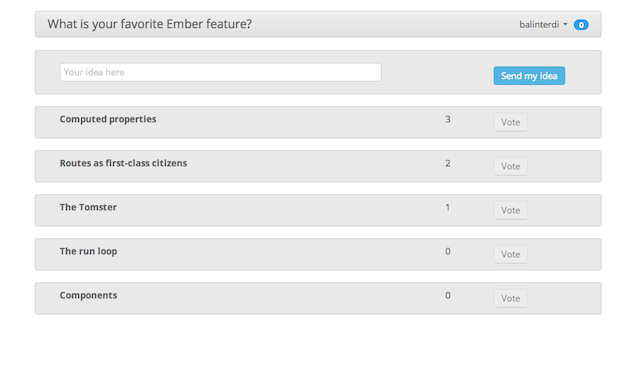
The application we are going to build is an “Idealist”. Users can submit ideas and vote on existing ones.

When one loads the application it looks like the following:

Ideavote screenshot

A list of ideas is displayed along with the number of votes for that idea and a button to vote that idea up.

To get the existing ideas from Firebase, we use the model hook of the appropriate route:

1
2
3
4
5
6
7
8
9
10
var dbRoot = "https://emberfire-ideavote.firebaseio.com";
var ideasPath = dbRoot + "/ideas";

App.IdeasRoute = Ember.Route.extend({
  model: function() {
    return EmberFire.Array.create({
      ref: new Firebase(ideasPath)
    });
  }
});

This loads the ideas in an EmberFire.Array and then iterates through them in the ideas template:

<script type="text/x-handlebars" data-template-name="ideas">
  {{ render "ideas/new" }}
  <div class="idea-list">
    <ul class="unstyled">
      {{#each controller}}
        {{ render "idea" this }}
      {{/each}}
    </ul>
  </div>
</script>

So how does adding a new idea happen? If we take a look at the ideas/new template, we can see that clicking on the “Send my idea” button triggers the sendIdea action:

<script type="text/x-handlebars" data-template-name="ideas/new">
  <div class="idea new-idea">
    <div class="row">
      <div class="span9">
        {{input value=title placeholder="Your idea here" insert-newline="sendIdea"}}
      </div>
      <div class="span2">
        {{#if isDisabled}}
          <button disabled="disabled" {{bindAttr class="isDisabled:disabled"}}>Send my idea</button>
        {{else}}
          <button {{bindAttr class="isDisabled:disabled"}} {{action sendIdea}}>Send my idea</button>
        {{/if}}
      </div>
    </div>
  </div>
</script>

The triggered sendIdea action is then handled on the controller:

1
2
3
4
5
6
7
8
9
10
11
12
13
14
15
16
17
18
19
App.IdeasNewController = Ember.ObjectController.extend({
  title: '',

  actions: {
    sendIdea: function() {
      var newIdeaRef = new Firebase(ideasPath).push();
      var newIdea = EmberFire.Object.create({ ref: newIdeaRef });
      newIdea.setProperties({
        id: newIdeaRef.name(),
        title: this.get('title'),
        submittedBy: this.get('auth.currentUser.id'),
        timestamp: new Date(),
        voteCount: 0
      });
      this.set('title', '');
    }
  }

});

We get a reference with a unique id by using Firebase’s push operation. We create an EmberFire.Object with that reference and that enables us to do our magic with the help of Firebase. When we then set any property on the object, it is going to be persisted on our backend and synchronized to all clients.

Extending the EmberFire classes

Up until this point, we did not need to create our own model classes. The basic EmberFire classes were sufficient for our needs. However, if we need to define additional behavior for our models, we have to extend these primitives.

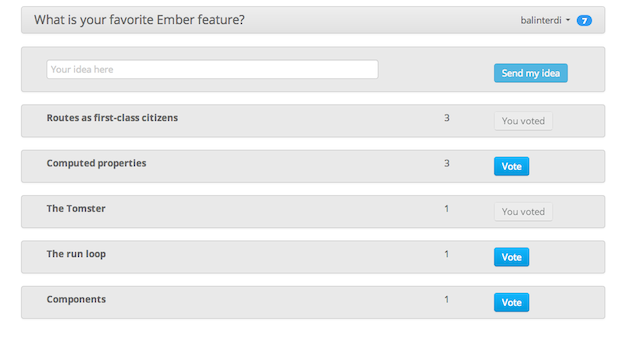
Suppose, for example, that each user has a certain number of votes and we want to prevent further voting when she does not have any votes left, as shown on the next mockup:

Ideavote screenshot

We can define a computed property on the user that would tell whether she has any votes left. Computed properties in Ember are properties that depend on other -computed or “normal”- properties and get automatically updated when one of the dependent properties change.

To do that, we need to define our User model:

1
2
3
App.User = EmberFire.Object.extend({
  noVotesLeft: Ember.computed.lte('votesLeft', 0),
});

The above is a computed macro definition that defines noVotesLeft as true if the votesLeft property of the user is less than or equal to zero.

Then, in the template that renders each idea, we disable the button if that computed property is true and also give it a grey hue to indicate its disabled state:

<script type="text/x-handlebars" data-template-name="idea">
  <li>
    <div class="idea">
      <div class="row">
        <div class="span8">
          <strong>{{title}}</strong>
        </div>
        <div class="span1">
          {{voteCount}}
        </div>
          <div class="span2">
            <button {{bind-attr class=":btn auth.currentUser.noVotesLeft:btn-disabled:btn-primary"}}
                    {{bind-attr disabled="auth.currentUser.noVotesLeft"}}>Vote</button>
          </div>
      </div>
    </div>
  </li>
</script>

Keep in mind that the context of the template is an idea and our computed property is defined on the user, hence the need for auth.currentUser.noVotesLeft.

Wait, there is more

Taking things a step further, I have also integrated Firebase’s SimpleLogin authentication service and prevented the same user to vote on the same idea multiple times. If you wish to see how these are implemented, I encourage you to check out the source code of the project.

I hope I got you interested in learning more about how to build real-time web applications and gave you a basic example of how to use state-of-the-art tools to do so.

Roll Your Own Ember.js Identity Map

If you followed along my Build an Ember app screencast series and maybe played around with the app on your own, you might have noticed a subtle bug in the application.

When you load the application on the /artists/ route and then choose one of the artists, the artist link gets highlighted correctly:

Correct active highlight

However, when you reload the app on one of these artists routes (e.g /artists/pearl-jam), the artist link does not get the active highlight:

Incorrect active highlight

Understanding what is wrong

The first step of any debugging process is to understand where the bug lies. In order to do that we have to understand how highlighting a link as active works in Ember.js.

I wrote about this topic in detail in a guest post so let me just quickly summarize it here.

The artist links are rendered using the link-to helper. When active routes change (that includes the moment when the app is loaded from scratch) the isActive property for each link is recomputed. If it is found to be active, the activeClass is added to the view’s tag and that enables it to be displayed differently.

When is a link-to active? When its route name matches one of the current route names. This is pretty straightforward for static links but what about dynamic ones with context objects? In those cases, all the context objects have to match in order for the link to be considered active.

Let’s see our particular case. We have the following routes:

1
2
3
4
5
App.Router.map(function() {
  this.resource('artists', function() {
    this.route('songs', { path: ':slug' });
  });
});

And the following template that renders each artist link:

<script type="text/x-handlebars" data-template-name="artists">
  (...)
  {{#each model}}
    {{#link-to "artists.songs" this class="list-group-item artist-link"}}
      {{name}}
      (...)
    {{/link-to}}
  {{/each}}
  (...)
</script>

Each link is rendered with an artist object that comes from the model hook of the ArtistsRoute:

1
2
3
4
5
6
7
8
9
10
11
12
App.ArtistsRoute = Ember.Route.extend({
  model: function() {
    var artistObjects = Ember.A();
    Ember.$.getJSON('http://localhost:9393/artists', function(artists) {
      artists.forEach(function(data) {
        artistObjects.pushObject(App.Artist.createRecord(data));
      });
    });
    return artistObjects;
  },
  (...)
});

So the artist object that serves as the context for the artists.songs link has to be the exact same object as the one returned from the model hook of the ArtistsSongsRoute:

1
2
3
4
5
6
7
8
9
10
11
12
13
14
15
App.ArtistsSongsRoute = Ember.Route.extend({
  model: function(params) {
    var artist = App.Artist.create();
    var url = 'http://localhost:9393/artists/' + params.slug;
    Ember.$.getJSON(url, function(data) {
      artist.setProperties({
        id: data.id,
        name: data.name,
        songs: App.Artist.extractSongs(data.songs, artist)
      });
    });
    return artist;
  },
  (...)
});

Are they identical? Well, intuitively they are but Ember.js does not care about our intuition and so we should not, either. They are different objects since both were created by calls to App.Artist.create (App.Artist.createRecord calls App.Artist.create under the hood) which returns a new object every time. Bummer.

Replacing intuition with reality

Don’t be sad, it’s not bad.

What we need is to have the same model object to be returned for the same identifier. In the matter at hand, given an artist slug (that serves as an identifier) we want to get back the same App.Artist object every time we use it.

If you think about it, that’s what identity maps are for.

Wiring it up with promises

The identity map needs to be able to retrieve objects and also store them. Most importantly, it has to return the object from its map if it has already created it with the passed in id.

I will dump the code below and then explain what it does:

1
2
3
4
5
6
7
8
9
10
11
12
13
14
15
16
17
18
19
20
21
22
23
24
25
26
27
28
29
30
31
32
33
34
35
36
37
38
39
40
App.IdentityMap = {
  map: {},
  findAll: function(type) {
    var identityMap = this;
    return new Ember.RSVP.Promise(function(resolve, reject) {
      Ember.$.getJSON('http://localhost:9393/artists', function(artists) {
        var artistObjects = Ember.A();
        artists.forEach(function(data) {
          var artist = App.Artist.createRecord(data);
          identityMap.store('artist', artist.get('slug'), artist);
          artistObjects.pushObject(artist);
        });
        resolve(artistObjects);
      });
    });
  },

  find: function(type, id) {
    var identityMap = this;
    return new Ember.RSVP.Promise(function(resolve, reject) {
      var artist = identityMap.map[identityMap._key(type, id)];
      if (artist) {
        resolve(artist);
      } else {
        var url = 'http://localhost:9393/artists/' + id;
        Ember.$.getJSON(url, function(data) {
          var artist = App.Artist.create();
          artist.setProperties({
            id: data.id,
            name: data.name,
            songs: App.Artist.extractSongs(data.songs, artist)
          });
          identityMap.store('artist', id, artist);
          resolve(artist);
        });
      }
    });
  }
  (...)
}

As you can see, I used promises for the retrieval methods of the API.

Promises are a huge improvement over callbacks and deserve their own article book. They represent eventual values that are going to be either resolved (meaning success) or rejected (meaning failure) and can be passed around freely.

Ember.js relies on promises heavily in its routing API and uses the rsvp promise library. If a promise is returned from any model hook, the route transition does not begin until the promise is resolved.

Leveraging that property of Ember routing I return promises from both the findAll and find methods and then use them from the model hooks of the appropriate routes:

1
2
3
4
5
6
7
8
9
10
11
12
13
App.ArtistsRoute = Ember.Route.extend({
  model: function() {
    return App.IdentityMap.findAll('artist');
  },
  (...)
});

App.ArtistsSongsRoute = Ember.Route.extend({
  model: function(params) {
    return App.IdentityMap.find('artist', params.slug);
  },
  (...)
});

When I call App.IdentityMap.findAll from the ArtistsRoute the rendering of the artists template is stopped until the promise is resolved. That happens when the AJAX call has returned with the data for all artists and I call resolve(artistObjects).

Next, the model hook for the ArtistsSongsRoute is evaluated. It returns a promise that has to be resolved in order for the template to be rendered.

The artist is found in the identityMap because it has just been stored there during the findAll in the previous model hook resolution (see the identityMap.store('artist', artist.get('slug'), artist); line). Since it is the same object that was used as the context for the artist link, the bug is squashed.

The link now gets correctly highlighted as active:

Active highlight fixed

Notice we achieved something else, too. Instead of firing two AJAX calls, one to fetch all artists and then one to fetch the one serialized in the URL we now only have one call. We eliminated the second one by returning the object from the identity map.

Furthermore, I also think our code has become better organized. The models for our routes have now become one-liners and can quickly be read and understood at a casual glance instead of being buried under the minutiae of AJAX calls.

Profile Your Ember App With Ember-renderspeed

If your application has lots of things going on or you render a large list, you might see your once snappy app lose some of that swiftness. Naturally, you want to speed your application up and the first thing to do in these cases is to know where the bottlenecks are.

One solution to this is to integrate ember-renderspeed, a very simple library released by the Discourse team. It shows the rendering time of your templates and views on your development console, in a nicely nested form. Don’t get frightened by the verb “integrate”. It is as easy as downloading the js file and adding a script tag to it.

Once you did that, open your Javascript console in your browser, reload the page and observe the profile of your application. It is enabled by default on the Ember discussion forum, so you can take a look there. You will see something like the following:

ember-renderspeed screenshot

Under the hood, ember-renderspeed uses Ember’s instrumentation facilities, so should ember-renderspeed not work for your problem, you can always roll your own or use a third-party service, like Caliper.

That said, ember-renderspeed is a very quick and easy way to profile your app and can be the first tool you reach for when the need arises.

Find and Replace in All Files

You want to change a string with another one in some directory in your project.

Here is a one liner to do that:

1
for spec_file in $(ag -g _spec.rb spec/); do sed -i.bak 's/john/jane/g' $spec_file; done

A few caveats:

  • The match should be case-insensitive. Unfortunately, s/john/jane/gI does not work under OSX.
  • The -i tells sed to do an in-place replacement. Again, under OSX, however, you must give an extension for the backup files. A git clean -f can get rid of these in one fell swoop.
  • You can use find spec/ -name '_spec.rb' instead of the ag command. But why would you?

(If you know how to do the replacement with awk, or something similar, please tell me in the comments.)

Your text editor might already have a Find & Replace in project functionality. But maybe it does not. And surely, the command line version is most flexible.

The Appeal of One Paradigm Languages

As I was preparing for my presentation on Clojure data structures I flashed back to a recent programming task I had to overcome. I don’t remember exactly what it was but it involved grouping data by particular keys and having an array of values for each key. When such a task rears its head I always have to play around in the REPL (err, the browser console) to see the exact working of each function I am about to rely on.

Which one changes the array I call it on? Which one returns the new value and leaves the original intact? What about taking two arrays to make a third one? Javascript being slightly OOish, may I possibly use the + operator to join them together?

1
2
3
4
x = [1,2]; y = x.push(3);      // x = [1,2,3]; y = 3;
x = [1,2]; y = x.concat([3]);  // x = [1,2]; y = [1,2,3]
x = [1,2]; y = x.concat(3);    // x = [1,2]; y = [1,2,3]
x = [1,2]; y = [3]; z = x + y; // z = "1,23" WAT?

I spend a considerable amount of time trying these out and since I discover no overarching design behind how they operate I come away none-the-wiser and so repeat the same process on a slighly different problem some time later. (slice vs. splice, anyone?)

Before I bash on javascript some more, I find it important to state that it’s an enormous feat to design and implement a language in ten days, hat tip to Brendan Eich.

The point I want to get across is that not having a solid design principle behind a language is actually a hindrance. It slows you down by having to try the pieces (functions, in this case) individually unless you have memorized them.

On the other hand, when you work with a language that has a design philosophy you gain the benefit of faster development. In Clojure, in the case of collection types, that principle is immutability. You don’t have to read the docs or fiddle around in the REPL. The original never changes, you get the “modified” version in the returned value:

1
2
(def x [1 2]) (def y (conj x 3)) ; x = [1,2]; y=[1,2,3]
(def x [1 2]) (def y (concat x [3]); x [1,2]; y=[1,2,3]

Let’s look at another language, Ruby.

Called on an array, push, concat, shift, pop and unshift all modify their caller. Push, concat and unshift return the modified array, while shift and pop return the removed element. So the rule seems to be that methods that expand the array return the new array, methods that take away an element return that element. So far so good.

What about take and drop? They both take away a number of elements, from the beginning or from the end, and the number of elements being passed in as a parameter. I’d totally expect these methods to change the original in place. After all, few names sound more destructive than drop. We’re in for a surprise. Both of them leave the original intact and return the taken (or dropped elements). In fact, you can pass in a number to both shift and pop which makes them identical to take and drop with the important distinction of whether they mutate or not the array they are called on.

To add to the confusion, there is delete which deletes all occurrences of the element that is given as the parameter and there is compact which does exactly the same for a special case, nil. (So compact takes no parameter). However, it turns out that delete is mutating, but compact is not, preferring to return the array with no nils. compact! comes to the rescue which does mutation and so x.compact! is the same x.delete(nil).

To give an analogy from natural languages, learning operations on collections in Ruby and Javascript is like learning the article for each noun in German (der, die or das). There are rules but they are hard to remember in the first place and are often violated.

Learning the same thing in Clojure is like learning articles in English: there is one true way to do it.

Install Ruby 2.0.0 With Rbenv (Ruby-build) on Mountain Lion

  1. You need to download the source, or use ruby-build to install it for you. I will subsequently suppose the latter.
  2. You need to configure it, compile it and copy files to the proper location:
1
RUBY_CONFIGURE_OPTS=--with-openssl-dir=`brew --prefix openssl` CONFIGURE_OPTS=--with-gcc=clang rbenv install 2.0.0-p195

You can see I installed openssl through homebrew. The ruby-build recipe downloads an openssl lib for you so only use that if you have it installed as I do.

I got the clang compiler frontend through Apple’s Command Line Tools so I’m not sure that’s needed if you have the whole Xcode package.

It really feels faster -maybe due to the improved GC-, rails starts >2 as fast as compared to plain 1.9.3, using spring in both cases.

Ruby Rogues - Discourse With Jeff Atwood

Ruby Rogues is one of the handful of podcasts I usually listen to. This week featured Jeff Atwood who talked about Discourse, a phenomenal forum platform. Jeff’s thoughts on several things really struck home so I wanted to jot them down. You might find these thought-provoking, too. The full transcription is available here

  • Installing a binary app per device is a huge step backward from the web world where you don’t have to download and upgrade anything. You just go to the website and it works.
  • Betting on Javascript is a very safe bet. The competition has been the fiercest among browser performances, that is Javascript engines on the client. The engines are guaranteed to improve.
  • Desktop computers are -in most cases- more performant than the server the application is hosted on. So it makes sense to push computations to the clients, and spread it out among them.
  • [Discourse] using postgres is a way to force hosting providers move out of the “server herpes” (PHP + MySQL). As Discourse becomes more popular, this will give more leverage to remove the herpes from servers.
  • Why was it [the server side] built in Ruby/Rails? Robin Ward made a game about forums and Jeff contacted him to build Discourse. Robin had used Ruby and thus this decided the Ruby or Python question.
  • Rule of 3. Kind of a philoshopical belief for Jeff. A component (e.g a datepicker) is proven to be reusable if it was successfully used in three different contexts. Having three major partners for Discourse will really be a tipping point. Etc.
  • Since Discourse is mainly a rich, client-side app, Ember plays a much bigger role in its success (or failure) then Ruby. The question is how will Rubyists adapt to Ember, whether they will like it or not.

Discourse is built on Ember, and Ember uses Discourse as a forum. For one, I welcome our new rich-client overlords.